PlotPanel/zh CN
│
Deutsch (de) │
English (en) │
español (es) │
français (fr) │
português (pt) │
中文(中国大陆) (zh_CN) │
Plotpanel
目前,PlotPanel不在积极开发和维护,只提供兼容性。
PlotPanel是Lazarusk中用来代替(或多或少)TChart的组件。 通过一些修改可以在Kylix、Delphi 5、6、7中使用。
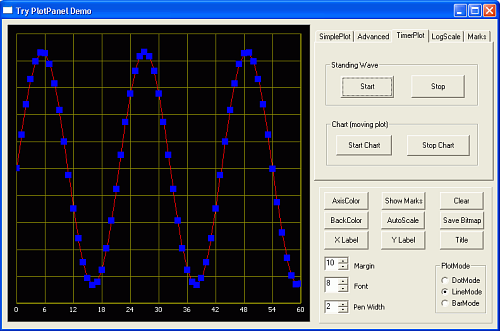
PlotPanel可以画线、点和条形图。也可以做动画图形。
软件没有任何书面保证,所以使用时需要您自担风险。
屏幕截图
安装
在Lazarus中安装PlotPanel,你需要做到以下几点:
- 下载PlotPanel包 (plotpanel.zip) 在:http://science4all.nl/?Programming:MICAM:Lazarus 或 Lazarus CCR SourceForge 站点。
- 解压plotpanel.zip到你选择的目录中。
- 打开Lazarus
- 执行安装包时所必须的操作 (参看 安装包).
当你完成上面的操作后,palet组件会在组件工具栏“Extra(额外)”选项卡里。 现在,您可以使用Plotpanel了。
运行PlotPanelDemo 来探索PlotPanel新功能。N.B.你可以尝试在没有安装PlotPanel 组件的情况下,运行TryPlotPanel!
Plotpanel在Lazarus 0.9.28.x上有个问题
在我的网站上 (http://science4all.nl/?Programming::Lazarus) 你可以找到更新的版本: PlotPanel-0.97
PlotPanel组件描述
这是一个欠佳的组件描述。示例将演示如何使用组件。
PlotPanel 组件来源于 TCustomPanel组件。
面板绘图功能被添加。
属性继承自TCustomPanel
- Align, Anchors, Autosize, BevelInner / Outer / Width
- Borderspacing, BorderStyle, Borderwidth
- Color is the color of the border of the plot
- Constraints, Cursor, Dragmode, Enabled
- Font is the font of the title of the plot
- Height, HelpContext, HelpKeyword, HelpType, Hint
- Left, Name, ParenColor, Parentfont, ParentShowHint
- PopupMenu, ShowHint, TabOrder, TabStop
- Tag, Top, Visible, Width
添加以下属性
- BackColor 绘图区域的背景颜色
- GridColor 网格颜色,当和背景色相同时,会看不到网格
- LayerOption 对于容易绘制的单层可以设置为假,它是不可能被直接设置为真(参见方法)
- Margin 绘图区边框宽度(单位:像素)。
- PlotMode 三种模式: pmBar, pmLine 和 pmDot
- PlotPen Properties of the plotting pen. If LayerOption is False, then all sub-properties can be set. If LayerOption is True, then information about the plotting penis transferred via the LayerOptions method (methods)
绘图笔属性。如果LayerOption为False,那么所有的子属性可以设置。如果LayerOption为True,则有关绘图笔信息通过LayerOptions方法转移(方法)- Title 标题在图的顶部居中位置,并使用Font属性
- PlotBMP 这是一个位图的整体图(见演示使用)
x轴属性:
- XLabel X轴标签
- XMarks 为真时,X轴标记
- XMarksFont 标记字体
- XMarksInterval 网络线间隔(适用于线性标尺)
- XMax X最大可见值
- XMin X最小可见值
- XScaleLog When TRUE the scale is logarithmic (the interval is determined by the component).
如果为真线性是对数(间隔由组件来确定)
y轴的相同应用。
方法
AddXY(X,Y:Extended)
使用这这个方法,你可以绘制点或线。
示例
for i:= -10 to 10 do
   PlotPanel1.AddXY(i,i*i)
This plots a parbola .The line is plotted with the PlotPen properties.
此绘制了parbola ,PlotPen 属性绘制线。注意你只能绘制单层。
AddXY(X,Y:Extended, Color:Tcolor,Layer:Integer)
用这种方法,可以绘制多达8条不同颜色的线,plotmodes和penwidths(见LayerOptions如何设置线宽和plotmodes)
LayerOptions(Layer:Integer;PlotMode:TPlotMode;PenWidth:Integer)
每一层可以使用不同的Plotmode和PenWidth当你调用这个方法LayerOPtion将被设置为TRUE。
当你想再次使用单层你必须设置LayerOption为假!
Autoscale(Layer:Integer)
有了这个方法,可以自动调整图形大小。
ClearData
清除绘图数据
ConvertS2W(x,y: Extended; var WX,WY : Extended)
转换屏幕坐标X,Y为实际坐标WX,WY。当X和Y超出边界时,函数返回False,否则真。
Freeze(Boolean)
When Freeze(True) is executed all plotting is done on a invisible bitmap.
当Freeze(True)时执行所有绘图上完成一个无形位图。
After a Freeze(False) the whole plot is displayed. This produces flicker-free animations.
当Freeze(False)时,将显示整个绘图。这将产生无闪烁的动画。
HideLayer(Layer:Integer)
使用这个隐藏单层绘图
UnHideLayer(Layer:Integer)
显示隐藏层 N.B. When you add points to a hidden layer, the old layer is deleted and the new points are the only points in this layer!
当指向一个隐藏层,老层被删除,新点也是唯一的点在这一层!
Paint
重绘整图(必要时由系统自动完成)
Marien van Westen
