Main menu/hu
│
Deutsch (de) │
English (en) │
español (es) │
suomi (fi) │
français (fr) │
magyar (hu) │
italiano (it) │
日本語 (ja) │
македонски (mk) │
Nederlands (nl) │
português (pt) │
русский (ru) │
slovenčina (sk) │
shqip (sq) │
中文(中国大陆) (zh_CN) │
中文(臺灣) (zh_TW) │
A főmenü
A fő menüsor a következő elemeket tartalmazza: Fájl Szerkesztés Keresés Nézet Projekt Futtatás Csomag Eszközök Környezet Ablak Súgó
Megszokott módon, a menüpontok kiválaszthatók az egérrel, vagy az Alt+F lenyomásával.
Fájl menü
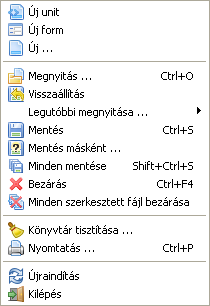
- Új unit: Egy új unit fájl létrehozása (Pascal forrás).
- Új form: Egy új form létrehozása: mind a vizuális, mind a Pascal forrás hozzá lesz rendelve a projekthez.
- Új ...: Egy listából választhatod ki, hogy milyen típusú dokumentumot szeretnél létrehozni.
- Megnyitás ...: Egy létező fájl megnyitása.
- Visszaállítás: A fájl minden változásának elvetése, és visszaállítása az eredeti állapotra.
- Legutóbbi megnyitása ...: A legutóbb szerkesztett dokumentumok listájából egy fájl megnyitása.
- Mentés: Az aktuális fájl elmentése az eredeti fájlnévvel. Ha nincs neve, a rendszer kérni fog egyet tőled (mint a Mentés másként ... esetén).
- Mentés másként ...: Megadhatod, hogy hová és milyen néven szeretnéd menteni az aktuális fájlt.
- Minden mentése: Minden, a szerkesztőben megnyitott fájl mentése.
- Bezárás: Az aktuális fájl bezárása.
- Minden szerkesztett fájl bezárása: Minden, a szerkesztőben megnyitott fájl bezárása. Rákérdez, hogy mented-e a változásokat.
- Könyvtár tisztítása ...: Egy párbeszédablakban megadhatod, hogy milyen szűrők alapján töröljön fájlokat a Lazarus egy adott könyvtárból. Hasznos a .bak és egyéb régről maradt fájlok törléséhez.
- Nyomtatás ...: A rendszernyomtató használata a kijelölt fájl kinyomtatásához. Ez a menü elem nem jelenik meg alapértelmezetten; telepítened kell alapértelmezetten a $Lazdir/components/printers/design/printers4lazide.pas-t és újra kell fordítanod az IDE-t.
- Újraindítás: A Lazarus újraindítása - hasznos, ha a fájlok reménytelenül összekeveredtek!
- Kilépés: Kilépés a Lazarus-ból, rákérdez a szerkesztett fájlok mentésére.
Szerkesztés menü
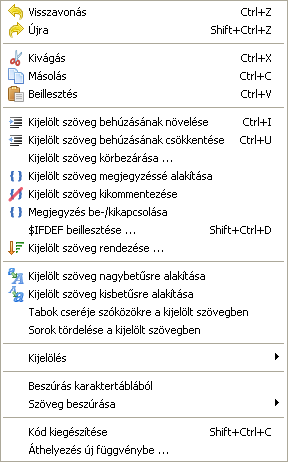
- Visszavonás: A legutolsó szerkesztési művelet visszavonása (csak a forráskód szerkesztőben működik).
- Újra: A Visszavonással visszavont művelet újra-végrehajtása.
- Kivágás: A kijelölt szöveg vagy egyéb elem törlése, és vágólapra helyezése.
- Másolás: A kijelölt szöveg másolása a vágólapra.
- Beillesztés: A vágólap tartalmának beillesztése a kurzor pozíciójától kezdődően. Ha éppen van kijelölve szöveg, akkor az felülíródik a vágólap tartalommal.
- Kijelölt szöveg behúzásának növelése: A kijelölt szöveg behúzásának növelése a beállított értékkel (Környezet -> Beállítások -> Szerkesztő -> Általános -> Behúzás és tabulátorok). Ez hasznos a Pascal kód formázásához, mivel így jobban átláthatóvá teheted a programod szerkezetét.
- Kijelölt szöveg behúzásának csökkentése: A kijelölt szöveg behúzásának csökkentése a beállított értékkel.
- Kijelölt szöveg körbezárása ...: Egy megnyíló ablakban adhatod meg, hogy milyen kifejezésekkel szeretnéd körbezárni a kijelölt kódrészletet (begin ... end; try ... except; try ... finally; repeat ... until; { ... } stb.).
- Kijelölt szöveg megjegyzéssé alakítása: Megjegyzéssé alakítja a kijelölt szöveget, minden sor elé // -t helyezve.
- Kijelölt szöveg kikommentezése: A komment jelek eltávolítása.
- Megjegyzés be-/kikapcsolása: A kijelölt kódrészlet elé helyezi a komment ( // ) jeleket, ha nincsenek előtte, illetve eltávolítja őket, ha ott vannak.
- $IFDEF beillesztése ...: {$IFDEF} fordítói direktíva beillesztése, amelynek a szerkezetét egy megnyíló ablakban lehet meghatározni.
- Kijelölt szöveg rendezése ...: Sorok (vagy kifejezések vagy bekezdések) redezése ábécé rendbe; megadható, hogy növekvő vagy csökkenő sorrendben, illetve, hogy érzékeny legyen-e kis-/nagybetűre. Hasznos lehet pl. listák, függvények rendezéséhez.
- Kijelölt szöveg nagybetűsre alakítása: A kijelölt szöveget nagybetűsre alakítja.
- Kijelölt szöveg kisbetűsre alakítása: A kijelölt szöveget kisbetűsre alakítja.
- Tab-ok cseréje szóközökre a kijelölt szövegben: A kijelölt szöveg minden TAB karakterét kicseréli a beállított mennyiségű szóközre (Környezet -> Beállítások -> Szerkesztő -> Általános -> Behúzás és tabulátorok).
- Sorok tördelése a kijelölt szövegben: Ha bármelyik sor hosszabb 80 karakternél, illetve a beállított sorhossznál (Környezet -> Beállítások -> Szerkesztő -> Megjelenés -> Margó és hasábköz -> Jobb margó), akkor a sort megtöri a kifejezés határánál.
- Kijelölés ...: Lehetővé teszi kódrészletek kijelölését bizonyos feltételek alapján.
- Beszúrás karaktertáblából: Lehetővé teszi a billentyűzeten nem megtalálható karakterek beszúrását.
- Szöveg beszúrása: Egy felugró menüből kiválasztható szabványos szövegek beszúrására ad lehetőset. Ilyenek pl.: CVS kulcsszavak, GPL megjegyzés, felhasználó neve, vagy a jelenlegi dátum és idő.
- Kód kiegészítése: Kiegészíti a kurzornál lévő kódot. Tartalomérzékeny és rengeteg időt lehet megtakarítani vele. Például osztályokat, illetve azok tulajdonságait hozhatod létre, függvények implementációt szúrhatod be, vagy nem deklarált, de felhasznált változók deklarációját hozhatod létre vele. Lásd Lazarus IDE eszközök.
- Áthelyezés új függvénybe ...: A kijelölt kódrészlet felhasználása egy új függvény létrehozásához.
Keresés menü
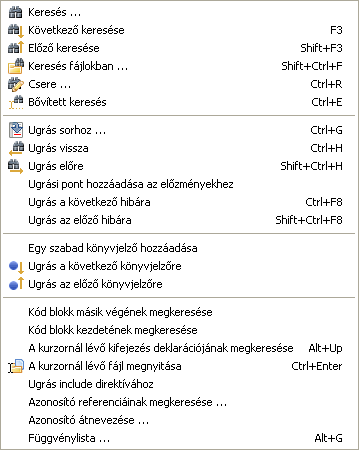
- Keresés ...: Hasonlóan a legtöbb grafikus szövegszerkesztőhöz, itt is egy megnyíló új ablakban adhatod meg a keresendő szöveget, a szokásos keresési feltételekkel.
- Következő keresése, Előző keresése: Értelemszerűen, az előzőleg megadott szöveg újra keresése, a megadott irányban.
- Keresés fájlokban ...: Szöveg keresése fájlokban: egy megnyíló új ablakban adhatod meg, hogy melyik fájlokban szeretnél az adott szövegre keresni.
- Csere: Hasonló a Kereséshez; a kereső ablakban adhatod meg, hogy a keresett szöveget mire szeretnéd cserélni.
- Bővített keresés: Úgy tudsz szövegre keresni, hogy közben változtathatod a keresett szöveget. A forráskód szerkesztő alsó sávjában adhatod meg a keresendő szöveget, és azonnal megjelennek a találatok a forráskódban kiemelve.
- Ugrás sorhoz ...: A kurzor mozgatása az adott sorhoz.
- Ugrás vissza: Ugrás az előző pozícióhoz. Minden hibára való ugráskor, az IDE elmenti az előző pozíciót, így ezzel a funkcióval mindig eggyel visszább tudsz ugrani.
- Ugrás előre: Ugrás a következő pozícióhoz. Visszavonja az Ugrás vissza parancsot.
- Ugrási pont hozzáadása az előzményekhez: Hozzáadja a jelenlegi pozíciót az ugrási történethez.
- Ugrás a következő hibára, Ugrás az előző hibára: A fordító által generált hibalista alapján ugorhatsz a hiba helyére a forráskódban előre vagy hátra.
- Egy szabad könyvjelző hozzáadása: Az aktuális sor megjelölése a következő szabad könyvjelzőként, és hozzáadása a könyvjelző-listához.
- Ugrás a következő könyvjelzőre, Ugrás az előző könyvjelzőre: Ugrás számsorrendben az előző vagy a következő könyvjelzőhöz.
- Kód blokk másik végének megkeresése: Ha egy begin parancson áll a kurzor, akkor a hozzátartozó end-re ugrik, és fordítva.
- Kód blokk kezdetének megkeresése: Annak a függvénynek a begin parancsára ugrik a kurzor, amelyiknek a belsejében éppen áll.
- A kurzornál lévő kifejezés deklarációjának megkeresése: A kurzornál lévő kifejezés deklarációjára ugrik. Ha a fájl, amelyikben deklarálva van nincs megnyitva, akkor megnyílik automatikusan. (További információk)
- A kurzornál lévő fájl megnyitása: Megnyitja azt a fájlt, amelyiknek a neve megegyezik a kurzornál lévő névvel. Hasznos a projektben használt include és unit fájlok megnyitásához.
- Ugrás include direktívához: Ha a kurzor egy inkludált fájlban van, akkor oda fog ugrani, ahol a fájlhoz tartozó {$include} direktíva található.
- Azonosító referenciáinak megkeresése ...: Előállít egy listát azokról a helyekről, ahol az adott azonosító referenciája megtalálható.
- Azonosító átnevezése ...: Lehetővé teszi egy adott azonosító egyidejű átnevezését a megadott hatókörben.
- Függvénylista ...: Előállít egy listát minden függvényről - ami az aktuális fájlban található - a deklarációjuk sorszámával együtt.
Nézet menü
A különböző ablakok és panelek megjelenítését vezérelheted innen. Azok az ablakok, amelyek meg vannak nyitva, előtérbe hozhatók, illetve amelyek nem voltak megnyitva, innen megnyithatók.
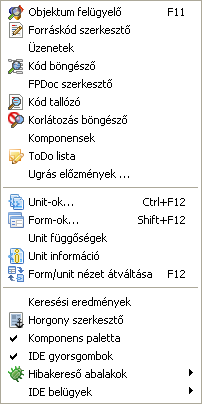
- Objektum felügyelő: Az ablak, amely általában az asztal bal oldali részét foglalja el, és az éppen tervezés alatt álló form tulajdonságait tartalmazza. A form-on bármelyik komponensre kattintva, megjelennek annak tulajdonságai az Objektum felügyelőben. Van egy panel a felső részben, ahol a form komponens-struktúrája található. Az adott komponens, amit szerkeszteni szeretnél, ezen keresztül is kiválasztható. Az alsó részben található a tulajdonság- és eseményszerkesztő rész, amelyeket a lapfülekkel tudsz átváltani.
- Forráskód szerkesztő: A fő ablak, amelyben a programod forráskódját szerkesztheted.
- Üzenetek: Az ablak, amelyik a fordító üzeneteit jeleníti meg.
- Kód böngésző: Egy ablak, amely általában a képernyő jobb oldali részén jelenik meg, és a jelenleg a forráskód szerkesztőben aktív oldalon lévő unit vagy program struktúráját tartalmazza faábrában. A faábrában a függvényeken (metódusokon) kívül a változók, típusok és konstansok is megjelennek. Ha a Forráskód szerkesztőben átváltasz egy másik lapra, frissítened kell a frissítés gombbal.
- FPDoc szerkesztő: Megnyitja az FPDoc szerkesztőt, ahol a programodhoz dokumentációt készíthetsz.
- Kód tallózó: Egy új ablakban különböző kifejezésekre kereshetsz az összes Lazarus-ban regisztrált kódban, beleértve a projektedet is, sokféle feltétel alapján.
- Komponensek: A Lazarus-ba telepített komponensek között böngészhetsz, illetve kereshetsz egy új ablakban, többféle nézetben.
- ToDo lista: Megnyithatod egy új ablakban a tennivalók listáját.
- Ugrás előzmények ...: Egy új ablakban megjelenítheted az előző ugrásokat.
- Unit-ok...: Egy olyan ablak, amely az aktuális projektben használt unit és include fájlokat tartalmazza. Itt ki tudsz közülük választani - akár egyszerre többet is - és az OK gombbal megnyithatod őket a Forráskód szerkesztőben.
- Form-ok...: Egy olyan ablak, amely az aktuális projektben használt form-okat tartalmazza. Ki tudsz jelölni egyet vagy többet és az OK gombbal megnyithatod őket szerkesztésre.
- Unit függőségek: Egy olyan ablakot nyit meg, ahol az aktuális projektben használt unit-ok függőségeit nézheted meg egy faábrában.
- Unit információ: Egy ablakban kategorizáltan megtekintheted az éppen a Forráskód szerkesztőben megnyitott unit adatait.
- Form/unit nézet átváltása: Átválthatsz a Forráskód szerkesztőről a Form tervező nézetbe, és vissza. Általában az F12 gyorsbillentyű van hozzárendelve ehhez a funkcióhoz.
- Keresési eredmények: A Keresés fájlokban ... funkcióhoz tartozó eredmények tudod megjeleníteni ezzel a menüponttal.
- Horgony szerkesztő: Az éppen kijelölt vezérlő horgonyzását szerkesztő ablakot nyitja meg.
- Komponens paletta: Elrejtheted/megjelenítheted a fő ablakban lévő komponens palettát.
- IDE gyorsgombok: Elrejtheted/megjelenítheted a fő ablakban lévő gyorsgombokat (pl. megnyitás, mentés stb.).
- Hibakereső ablakok: Egy felugró menüből választhatod ki azt az eszközt, ami a hibakereséshez szükséges. Lásd: hibakereső.
- IDE belügyek: Az IDE-hez tartozó állapotelemző ablakok nyithatók meg innin.
Projekt menü
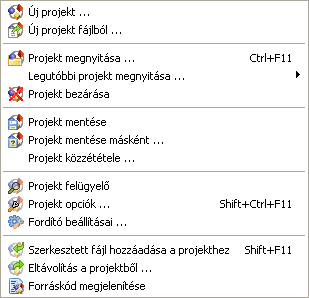
- Új projekt ...: Egy új projekt létrehozása. Egy új ablakban választhatod ki, hogy milyen típusú projektet szeretnél létrehozni.
- Új projekt fájlból ...: Kiválaszthatsz egy fájlt, ami alapján új projektet hozhatsz létre.
- Projekt megnyitása ...: Egy létező projektet nyithatsz meg.
- Legutóbbi projekt megnyitása ...: Almenüként megjelenő listából választhatod ki a legutóbb megnyitott projektek közül azt, amelyiket szeretnéd megnyitni.
- Projekt bezárása: Bezárhatod az éppen megnyitott projektet. Ha változás történt a legutóbbi mentés óta, akkor egy párbeszédablak jelenik meg, ahol a változásokat mentheted, illetve eldobhatod. Ezután a projekt bezárul, és megjelenik a Projekt Varázsló ablak, ahol új projektet hozhatsz létre, megnyithatsz egyet, konvertálhatsz egy Delphi projektet, vagy kiléphetsz a Lazarus-ból.
- Projekt mentése: Mentheted a teljes projektet, attól függetlenül, hogy történt-e változtatás.
- Projekt mentése másként ...: Ezzel a paranccsal a projektet tulajdonképpen átnevezheted, illetve másolatot hozhatsz létre róla más néven. Az eredeti projekt fájlok is megmaradnak.
- Projekt közzététele: Másolat készítése a teljes projektről, bizonyos feltételek szerint. A feltételekben megadhatod, hogy milyen fájlokat szeretnél, illetve nem szeretnél a másolatban közzétenni. Ez a parancs hasznos, ha a projektednek például csak a forráskódját szeretnéd közzétenni, a sok .ppu, .o és egyéb fájlok nélkül. Lásd Lazarus IDE eszközök.
- Projekt felügyelő: Egy megnyíló ablakban láthatod a projekted szerkezetét egy faábrában. Itt megtalálhatók a projekt fájljai, szükséges csomagok, stb. Továbbá lehetőséged van új fájlokat hozzáadni, megnyitni, törölni, és a projekt beállításait szerkeszteni.
- Projekt opciók ...: Egy megnyíló ablakban szerkesztheted a projekt beállításait, úgy mint az alkalmazás tulajdonságait (cím, cél fájlnév, stb.), form-okat, stb.
- Fordító beállításai ...: Egy megnyíló ablakban szerkesztheted a projekttel kapcsolatos Free Pascal fordítói beállításokat.
- Szerkesztett fájl hozzáadása a projekthez: Ha megnyitottál egy projekten kívüli fájlt, akkor ezzel a paranccsal adhatod hozzá a projekthez.
- Eltávolítás a projektből ...: Egy megnyíló ablakban lévő listából választhatod ki azokat a fájlokat, amelyeket szeretnél eltávolítani a projektből.
- Forráskód megjelenítése: Ez a parancs megnyitja a Forráskód szerkesztőben a projekt fő program fájlját (.lpr vagy .pas).
Futtatás menü
Fordítás folyamatban... Nem lefordított angol szöveg
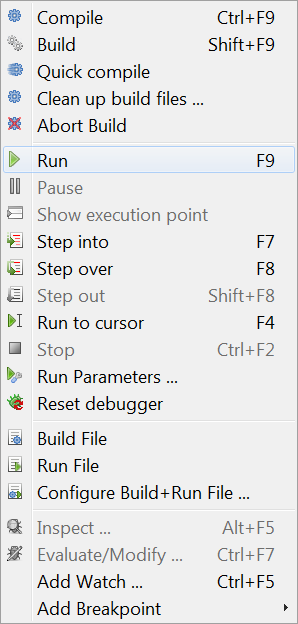
- Build: Causes Lazarus to build (ie compile) any files in the project that have been changed since the last build.
- Build all: Builds all files in the project, whether or not there have been any changes.
- Abort build: Stop the build process once it is running - either you have remembered that you did something silly and want to stop the build, or the system seems to be taking far too long and something is obviously wrong.
- Run: This is the usual way to launch the compiler and, if compilation is successful, to start execution of the application. What actually happens is that Lazarus saves a copy of your files, then starts the compiler and linker, then begins execution of the final linked binary program.
- Pause: Suspend execution of the currently running program. This may allow you to inspect any output that has been generated; execution may be resumed by selecting Run again.
- Step into: Used in conjunction with the debugger, causes execution of the program one step at a time up to a bookmarked point in the source.
- Step over: Causes stepwise execution up to the statement marked, then skips the marked statement, and continues execution at normal speed. Useful in trying to isolate a statement that introduces a logical error.
- Run to cursor: Causes execution at normal speed (ie NOT one statement at a time) until the statement is reached where the cursor is located; then stops. Resume execution at normal speed by selecting Run.
- Stop: Cease execution of the running program. Cannot be resumed by selecting Run; this will start the program again from the beginning (re-compiling if necessary).
- Run Parameters: Opens a multi-page pop-up window which allows command-line options and parameters to be passed to the program to be executed; allows selection of display to run program (eg a remote X terminal may be used in Linux); some system Environment variables may be overridden.
- One very important use of this sub-menu is to activate a terminal window in which conventional Pascal console input/output is displayed. If you are developing a console-mode Pascal program (ie one that doesn't use the Graphical User Interface with its forms, buttons and boxes) then you should check the box for "Use launching application". The first time you do this and try the Compile/Run sequence, you will probably get a rude message to say
"xterm: Can't execvp /usr/share/lazarus//tools/runwait.sh: Permission denied".
- If this happens, you need to change the permissions on the appropriate file (for example using chmod +x filename, or using the Windows utility for changing permissions); you might have to do this as root. After this, each time you launch you program, a console box will appear and all your text i/o (readln, writeln etc) will appear in it.
- After your program has finished execution, a message "Press enter" appears on the screen. Thus any output your program generated will remain on the screen until you have had a chance to read it; after you press 'enter' the console window closes.
- Note: as for the current version, there is no prepared console command for Windows users. Until the Lazarus team adressess that, the following line should work (on WinXP -- someone please update for other Windowses)
C:\Windows\system32\cmd.exe /C ${TargetCmdLine}
- See the separate tutorial on Console Mode Pascal programming.
- Reset debugger: Restores the debugger to its original state, so that breakpoints and values of variables etc are forgotten.
- Build file: Compile (build) just the file that is currently open in the Editor.
- Run file: Compile, link and execute just the currently open file.
- Configure Build + Run File: Opens a multi-page tabbed window with options to allow for build of just this file when Build Project is selected, allows selection of the working directory, the use of various Macros, etc. Then Builds and Runs the file.
- These last three options enable you to open (and maintain) a test project. Use File -> Open to open an .lpr file, pressing cancel on the next dialog to open this file as "normal source" file.
- Open Package: Displays a list of installed packages, with an invitation to open one or more of them, or to select various general or compiler options.
- Open Package File: Open one of the files in the selected package.
- Open Recent Package: Open a package that was opened recently.
- Add Active Unit to Package: Place the unit file (currently in the editor) into a package.
- Package Graph: Displays a graph showing the relationships of the packages currently being used (if you aren't using any other packages, the Lazarus package and the FCL and LCL will be displayed).
- Configure custom components: If you have created some components, allows you to configure them.
- Configure custom tools: Allows the user to add various external tools (usually macros) to the toolkit
- Quick syntax check: Perform a quick check of the syntax in your source file without actually compiling anything. Essential step in developing long or complicated programs, where you don't want to waste time compiling if the code is wrong.
- Guess unclosed block: useful utility if you have a complex nested block structure and you have left out an 'end' somewhere
- guess misplaced IFDEF/ENDIF: useful if there is a complex or nested macro structure and you think you have left out an ENDIF directive
- Make resource string: Makes the selected string a resource string by placing it in the resourcestrings section. An advantage of resource strings is you can change them without the need to recompile your project!
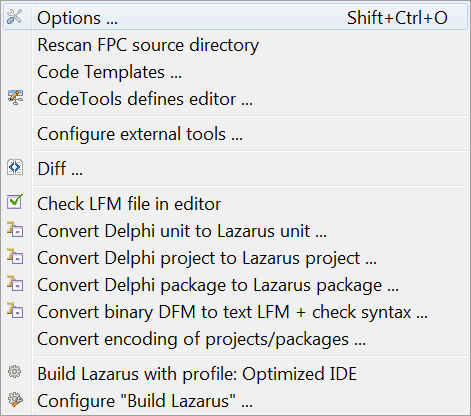
- Diff: Allows comparison between two files (or, usually, two versions of the same file) to find differences. Options to ignore white space at beginning or end of lines or differences in line termination: CR+LF versus LF). Useful for checking if there have been changes since last CVS update etc.
- Check LFM file in editor: Allows inspection of the LFM file which contains the settings that describe the current form
- Convert Delphi unit to Lazarus unit: Helps in porting Delphi applications to Lazarus; makes the necessary changes to the source file. See Lazarus For Delphi Users and Code Conversion Guide.
- Convert DFM file to LFM: For porting from Delphi to Lazarus: converts the Form Description files from Delphi to Lazarus. See Lazarus For Delphi Users and Code Conversion Guide.
- Build Lazarus: Launches a re-build of Lazarus from the most recently downloaded or updated SVN files. Hit the button and sit back to watch it happen! (track the process on your Messages window).
- Configure "Build Lazarus": Allows the user to determine which parts of Lazarus should be re-built, and how. For example, you could select to have just the LCL re-built, or to have everything except the examples built; you can select which LCL interface to use (ie which set of widgets), and you can select the target operating system and specify a different target directory.
Standard packages add the following menu items:
- Project templates. This item is added by the package Project Templates.
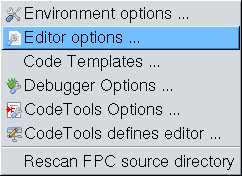
- Environment options: Displays a multi-page window with tabs for
- Files - allowing the user to specify path to default directory, compiler, source directory and temporary directory for compilation;
- Desktop - options for Language, Auto save behaviour, saving desktop properties, hints for component palette and speed buttons;
- Windows, to allow specification of size and behaviour of the various windows;
- Form Editor - choose colours for editing forms;
- Object Inspector - choose colour and height of items;
- Backup - specify how to backup files when editing;
- Naming - specify what extension to use in naming pascal files ('.pp' or '.pas'), whether to save files with names in lowercase, whether to perform auto-delete or auto-rename.
- Editor options: Multi-page window, with tabs for
- General - determines behaviour like auto-indent, bracket highlighting, drag-drop editing, scrolling, syntax highlighting, showing hints, size of block indent and tabs, limit of Undo;
- Display - options for showing line numbers, presence of gutters, size and type of font for editor, and contains a preview panel showing the colours of the various syntax features such as comments, directives, punctuation, errors and breakpoints;
- Key Mappings - options to select Lazarus or Turbo Pascal scheme;
- Color - allows choice of colour scheme for text features, for a number of language types such as Object Pascal, C++, Perl, HTML, XML and shell scripts. It shows preview panel again (for whichever language is selected);
- Code Tools - allows selection of features like Identifier Completion, tooltips, specification of template file names, specific templates for code completion.
- Debugger Options: Multi-page window with tabs for
- General - choose debugger: none, GNU debugger (gdb) or gdb through SSH, specify search paths for debuggers,and specific options for chosen debugger;
- Event log - specify whether to clear log on run, and which messages to display;
- Language Exceptions - select which exceptions can be ignored;
- OS Exceptions - allows user to add certain signals which apply to current operating system (not implemented).
- Code Tool Options: Multi-page window, tabs for
- General - Allows entry of additional source search paths, specify Jumping Method;
- Code Creation - determines whether created code is added before or after certain features;
- Words - determines whether Pascal keywords are to be entered in upper or lower case, or as Capitalised Words;
- Line Splitting - establish rules about where lines are allowed to be split (before or after punctuation, after keywords etc);
- Space - decide whether a space is to be added automatically before or after certain syntactic features such as keywords or punctuation marks.
- Code Tools Defines Editor: Here you can see all IDE internal definitions to parse sources. You will see all the defines, unit, source, include paths for all source directories. Beginning with the settings of the current FPC, the defines for the Lazarus Source directory, all package directories and project directories.
Most of these settings are auto generated and read only.
- Re-scan FPC Source directory Looks through the directory again. Lazarus uses the fpc sources to generate correct event handlers and while looking for declarations. If somebody changes the directory in the environment options, then this directory is rescanned, to make sure Lazarus uses the version stored in that location. But if this directory has changed without Lazarus noticing, then you may get some errors when designing forms or doing "Find declaration". If you get such an error, you can do two things:
- Check the fpc source directory setting in the environment option.
- Re-scan FPC source directory.
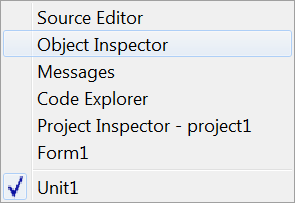
Contains a list of the currently opened files and the available windows such as Source Editor, Object Inspector and Project Inspector. Clicking on the name of one of the windows brings it to the foreground and gives it focus.
At present this has three selections:
- Online Help which at present opens a browser window that contains a picture of the running cheetah and a few links to the Lazarus, Free Pascal and Wiki websites
- Reporting a bug opens the wiki page, which describe the bug reporting procedure
- Configure Help which opens a pop-up menu with options to select viewers and databases from which to read Help information. This option allows the user to specify either the on-line documents section of the Lazarus-CCR website, some other website containing the documents, or a local store for the documentation (this would eventually become the default, when the Help system is fully developed).
At present by default, if you place your Editor cursor over any keyword from the Free Pascal Components Library FCL, the RunTime Library RTL or the Lazarus Components Library LCL, and then press F1 you will be taken by your default browser to the appropriate definition on the website. Be aware that your browser may be located on another desktop on your machine (eg in Linux), and you may not see the information immediately; of course if you are not connected to the internet you cannot get this information.
There are alternative help options which gives the end-user off-line help. For example, if you have a copy of Kylix, you can reuse the help files supplied with it, inside Lazarus IDE. See the Adding Kylix Help page for details.
- About Lazarus Displays a pop-up box with some information about Lazarus.
Eventually there will be a full on-line Help service, with information about Pascal syntax, the use of the IDE, how to use, modify or create Components, and hints on how to perform certain tasks. This part of the Documentation section (the thing you are currently reading) represents the beginning of the process. We need contributions from anyone who feels able to provide them: the WiKi is very easy to edit.
