Howdy World (Hello World on steroids)
│
English (en) │
suomi (fi) │
português (pt) │
This Wiki article is a tutorial for Lazarus. It explains the first steps to get a working piece of software and explains some best practices along the way. The end result is twofold (hopefully): the reader understands the basic concepts of how to build software with Lazarus and she has an actual piece of working software that can be embedded in other programs: a calculator. A calculator is fairly easy to implement and everyone understands its concepts. So no need to describe a lengthy business case beforehand. The calculator is limited to integer calculations, but can easily be extended.
This tutorial does not describe the Lazarus installation process. It is assumed that Lazarus is installed and ready for use (preferably the latest, stable version which is currently Lazarus 2.0.12 with Free Pascal v3.2.0). This tutorial is more or less platform independent (but targeted at thick clients). All screenshots were made on a Windows XP PC; hence the blue/red/grayish color scheme.
Recommended reading before starting here: a comprehensive introduction to the Lazarus IDE.
Let’s get started
It’s best to create a separate directory for every new project. So before getting our feet wet, let’s create a directory to save our Calculator project in (do this with your OS application of choice). This directory will be the root for all files created for the project.
- Create a new directory for the demo project (let’s call it $HOME/CalculatorDemo).
(Text that describes actions that must be executed is bulleted like the previous line.)
With this out of the way it’s time to start a new Lazarus project.
- Start Lazarus.
- From the menu choose Project/New Project…
- In the dialog that is presented select Application and press OK (if the IDE complains about unsaved changes, press No).
To make sure that all files of our new project end up in the right directory the project must be saved first.
- From the menu choose File/Save All.
- Select the directory that was created previously ($HOME/CalculatorDemo).
- Enter a new project name: CalculatorDemo
- Press Save (or whatever is the Save button in your own language)
- The IDE wants to save the main form as well: enter ’’ufrmMain’’ as the form's
unitname. - The IDE asks if the filename should be changed to a lowercase name. Confirm this by pressing the button ‘Rename to lowercase’.
In theory the program that is thus created is a piece of valid software that can be executed. Before compiling it for the first time, two changes are recommended: assigning new locations (directories) for the compiled units and target filename.
- From the menu choose Project/Project Options…
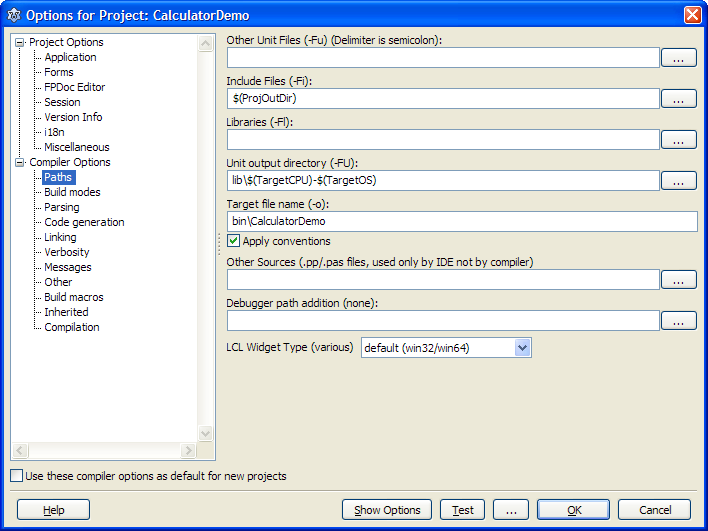
- Select Compiler Options/Paths (click on the node in the treeview)
- Put the text ‘‘bin\’‘ before the target filename (or ‘‘bin/’‘ for a *nix environment)
- Also note the ‘‘lib’‘ prefix for the ‘unit output directory’ (don’t change it).
- Press OK
The image below is how this would look like on a Windows machine.
By doing this the project folder will not be cluttered with output that is generated by the compiler. The files in the project folder are required to (re-) build the program. Everything in the ’’lib’’ and ’’bin’’ directories can be deleted when archiving the project.
Now as a first test the project can be compiled and run.
- Press F9 (the shortcut for compile, build and run the program)
If all went well a blank window is displayed. Now we know that a solid basis is created on which we can start building the program.
- End the running program by clicking on the Close icon (this depends on the OS).
The first component
Lazarus has a so called ‘component palette’:
All components that are available to build a user interface are logically grouped on the component tabs. The actual number of tabs depends on the installed packages. But the basic palette looks something like the above image. The first tab is Standard, followed by Additional, Common Controls etc.
To retrieve the type name of a component, hover with the mouse pointer above the component icon and a hint is displayed that gives the type name (to be more precise: the class type of the component is displayed). For an explanation of all controls look at this [[Lazarus_Tutorial|Lazarus introduction].
The first thing that needs to be done for the Calculator program is to create a display area where the entered numbers are, well, displayed. For this a TEdit control is used.
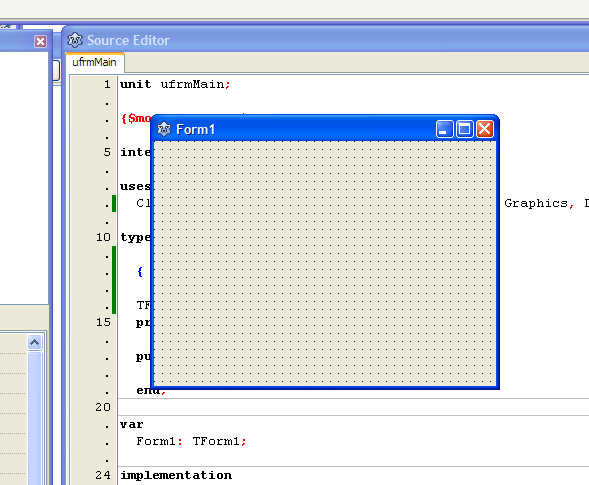
To place a control on the form, the form must have the focus. Pressing F12 on the keyboard changes the focus from the form editor to the source code editor and vice versa.
- Press F12 once or twice to get the form window on top (see image below).
- Select the Standard tab on the component palette. This is the tab that is selected by default.
- Click on the TEdit component (hover above the component icons to get the class type names).
- Click somewhere in the middle of the form. This places a TEdit control on the form that has a name that is the same as the control’s type without the capital 'T' and with a number at the end (e.g. Edit1). When a second TEdit control were to be placed on the form it would be named Edit2. And so forth. This applies to all components.
Now that the control is placed on the form it can be customized to our needs. This customization takes place in the Object Inspector. That is the window at the left side of the screen with the list of properties for the TEdit control that are customizable.
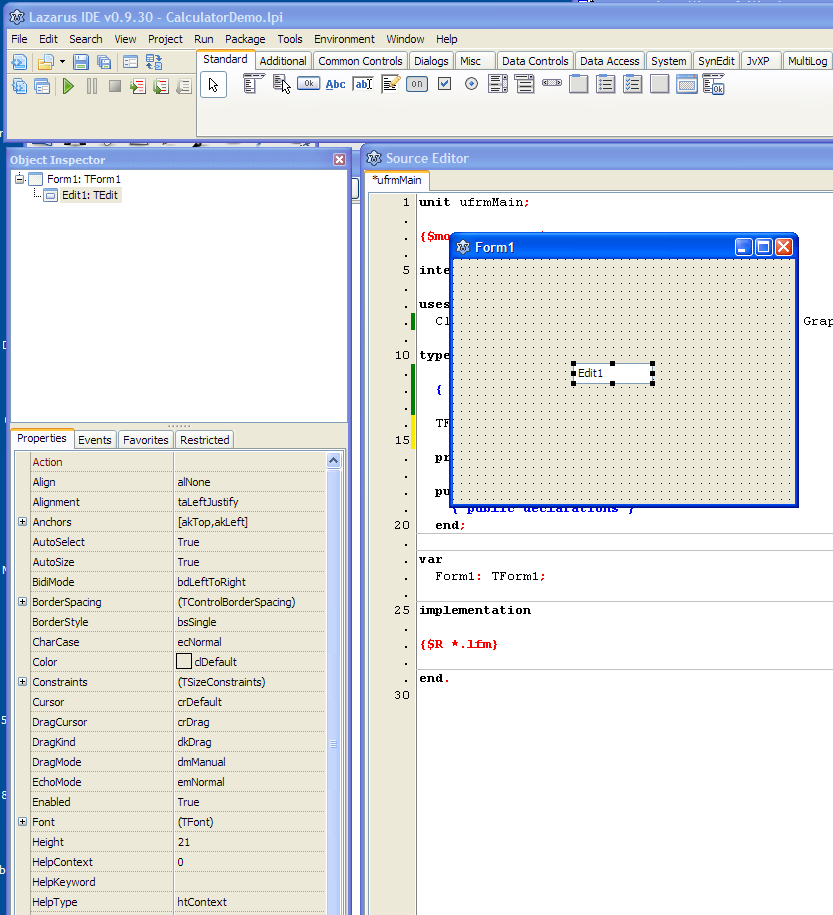
Properties determine the look and feel and behavior of a control. It’s easy to change a property: just click on one of them, enter a new value and press ↵ Enter. The effects on the control are instantly visible. The properties in the Object Inspector are all the properties for one control. In particular the control that has the focus/is selected. The control that is selected can be recognized by the small black squares that surround the control. So the way to change properties of a control is by first selecting it and then make the changes in the Object Inspector. If no control is selected, the form properties are displayed.
Make the following changes to the properties of Edit1.
- change Name to edDisplay.
- change Align to alTop (change Align, not Alignment!).
- change Alignment to alRightJustify (change Alignment, not Align).
- change BorderSpacing.Around to 6.
- change Text to 0 (the number zero, not the letter oh).
These properties are pretty self-explanatory. Especially when the above changes are made and the effect is monitored on the form.
As a finishing touch the Font that is used to display texts on all controls will be changed. The font can be changed in two places: the font property of edDisplay or the form’s font property. Changing the font for the form itself has the benefit that all newly placed controls on the form will 'inherit' the new font. So that is where we are going to make the change.
- Click somewhere in the middle of the form. This deselects the edDisplay control and selects the form itself. The form’s properties are now displayed in the Object Inspector.
- In the Object Inspector click on the Font property. The Font line is now highlighted and a button with three dots is displayed.
- Click on the button with the three dots. This opens the Font dialog.
- Select Verdana, Bold, Size 10.
- Press OK.
The Form’s title is not very meaningful. The default text 'Form1' is displayed.
- In the Object Inspector click on the Caption property.
- Change the caption text to Calculator Demo.
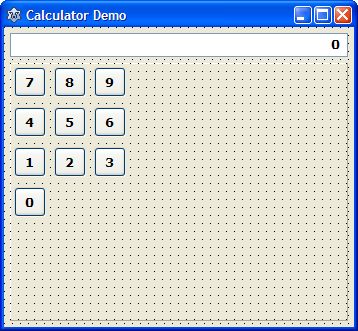
The result of all these actions is a form that looks something like this:
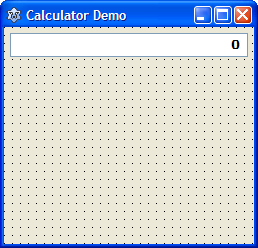
Now is a good time to save the form.
- Select from the menu File/Save or press the key combination CtrlS.
Remember to save and save often!
Buttons
What use is a calculator if numbers cannot be entered? So the next step is adding buttons for the digits 0..9. Before placing the buttons for the digits, a so called container is placed on the form. A container defines an area on a form where controls can be grouped together. The form is a container. A TPanel is another container that can be placed on a form. Containers can be placed inside other containers, but that’s for another tutorial.
- On the component palette, select the TPanel control.
- Click on the form to place the panel.
A new panel is now visible on the form with a default width, height and caption. Note that the font for the panel caption is inherited from the form. This panel will be used to group all buttons, so a number of properties must be changed.
- Remove the text Panel1 from the caption property.
- Change Align to alClient.
- change Borderspacing.Around to 6.
- increase the form’s Width to 300 (first click on Form1 in the Object Inspector treeview).
- increase the form’s Height to 350.
(Increasing the size of the form gives us some space to move controls around.)
Now the digit buttons will be added.
- On the component palette, select the TButton control.
- Click on the form, somewhere in the middle, to place the button. The button is placed on the panel. this is visible in the Object Inspector treeview: Button1 is a so called child of Panel1. This effectively means that when Panel1 is moved, all child controls move with it. And when Panel1 is deleted, all child controls are deleted as well.
- In the Object Inspector change Caption to 0
- Change Width to 32.
- Change Height to 30 .
- Change Name to btnDigit0.
This must be repeated for the digits 1..9. The quickest way to do this is by copy/pasting the 0-button.
- Right click on the button created above and select Copy from the pop up menu.
- Right click somewhere else on Panel1 and select Paste; a second button is added to the panel. The only difference with the first button is the name btnDigit1.
- change the Caption property in the Object Inspector to 1
- repeat the Paste action 8 more times for the remaining buttons.
- Move the buttons around on the form to get a lay out that looks like a calculator:
Next are the four buttons for the mathematical functions (add, subtract etc.).
- Drop a new TButton on the panel.
- Change Width to 32.
- Change Height to 30 .
- Change Caption to +
- Change Name to btnFunction.
- Copy/paste this button 3 more times, changing the caption to -, * and /.
- Align the buttons vertically, right next to the digit buttons
And the 'special' buttons:
- Copy/Paste the + button.
- Change Caption to +/-.
- Change Name to btnPlusMinus .
- Position the button just below button 3.
- Copy/Paste the + button.
- Change Caption to C.
- Change Name to btnClear.
- Position the button to the right of button +.
- Copy/Paste the + button.
- Change Caption to =.
- Change Name to btnCalculate .
- Position the button to the right of button /
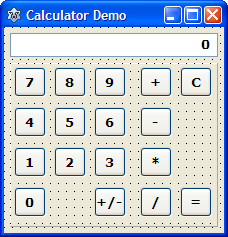
Not what all buttons are placed, resize the form to fit the buttons tightly.
It should look something like this:
Remember to save and save often!
Responding to events
A Graphical User Interface (GUI) application is often an event-based application. This means that the application does nothing until we tell it to do something. For example by entering data via the keyboard, pressing buttons etc. One of the things the calculator needs to do is respond to mouse clicks on the buttons 0..9. This is where the Lazarus IDE helps us. Adding a so called event handler for a button is easy.
- Make sure the form with all buttons is visible (if necessary press F12 once or twice).
- Double click on the button with caption 0: the IDE automatically creates a
procedurethat will handle mouse clicks: procedure TForm1.btnDigit0Click(Sender: TObject); - type the following code between
beginandend:
edDisplay.Text := edDisplay.Text + '0'
edDisplay is an edit box. The way to change the contents of the edit box is by modifying the Text property. The above statement adds the number '0' to the text in the edit box and this is visible on screen immediately.
- Double click on the button with caption 1.
- type the following code between begin and end:
edDisplay.Text := edDisplay.Text + '1'
It's a good idea to compile the code from time to time to check for syntax errors (Compile time error).
- Select from the menu: Run/Run (or press F9); the project is compiled and the application starts.
- Click the digits 0 and 1 a couple of times and see what happens on screen. The other buttons do nothing obviously because the event handlers have not yet been added.
- Stop the Calculator Demo program.
Of course it's now easy to add event handlers for the digits 2..9, but this will result in a lot of redundant code. Every event handler does exactly the same, only the digit is different. The way to remove this redundancy is by creating a procedure that does the processing, and add the variable data (the digits 0..9) as a parameter.
- In the editor locate the lines where class TForm1 is declared. It will look something like this:
  { TForm1 }

  TForm1 = class(TForm)
    btnDigit0: TButton;
    btnDigit1: TButton;
    btnDigit2: TButton;
    btnDigit3: TButton;
    btnDigit4: TButton;
    btnDigit5: TButton;
    btnDigit6: TButton;
    btnDigit7: TButton;
    btnDigit8: TButton;
    btnDigit9: TButton;
    btnFunction: TButton;
    btnFunction1: TButton;
    btnFunction2: TButton;
    btnFunction3: TButton;
    btnCalculate: TButton;
    btnPlusMinus: TButton;
    btnClear: TButton;
    edDisplay: TEdit;
    Panel1: TPanel;
    procedure btnDigit0Click(Sender: TObject);
    procedure btnDigit1Click(Sender: TObject);
  private
    { private declarations }
  public
    { public declarations }
  end;
Note that in the above class definition all controls and procedures are declared that we added to the form via 'pointing-and-clicking'. Do not make any manual changes in there!! The IDE will get nervous when you do. The place to add custom variables, procedures and functions is in the private or public sections. As a general rule all custom variables are added to the the private section. Procedures and functions are added to the private section as well, except when other forms need to call these procedures or functions (which shouldn't happen too often).
Back to our digits problem: we need a procedure that adds digits to the display, where the digits themselves can vary.
- Add procedure AddDigit to the
privatesection of the form.
  private
    { private declarations }
    procedure AddDigit(const pDigit: byte);
  public
    { public declarations }
  end;
Next the actual code of the AddDigit procedure must be entered. Again the IDE comes to the rescue:
- Place the blinking text cursor on the AddDigit line.
- Press key combination Ctrl⇧ ShiftC.
The IDE generates the definition of this new method and places the text cursor inside the empty body. We can immediately start typing.
- Add the following code to the AddDigit procedure body:
edDisplay.Text := edDisplay.Text + IntToStr(pDigit)
Note that function IntToStr() translates a numerical value, the digit, to a string value so it can be added to the display text.
Now to use this procedure for all digits 0..9:
- Open the form (if necessary press F12 once or twice).
- Double click on digit button 0: this will open the editor in the event handler for button 0.
- Replace the code in the event handler with: AddDigit(0). The procedure will look like this:
procedure TForm1.btnDigit0Click(Sender: TObject);
begin
  AddDigit(0)
end;
- Do the same for digit button 1:
procedure TForm1.btnDigit1Click(Sender: TObject);
begin
  AddDigit(1)
end;
Before completing this sequence for all other digit buttons, make sure that this actually does what we want.
- Run the program (press F9).
- Click buttons 0 and 1 a couple of times and see that it actually works.
- End the program.
A good programmer is a lazy programmer
Now we can add event handlers to digit buttons 2..9. But then again we have the same problem of creating a lot of redundant code: AddDigit(2), AddDigit(3) etc. What if there were a way to tell the buttons apart? Luckily there is.
All components have an integer property called Tag (remember: a control is just a special kind of component that inherits this Tag property). It is a property that has no actual function. It is there for us to use as we see fit. Now what if each button would have its digit value stored in the Tag property…
- Open the form (if necessary press F12 once or twice).
- Select digit button 1 (click on it once).
- In the Object Inspector locate the Tag property and change it's value to 1.
- Select digit button 2 (click on it once).
- In the Object Inspector locate the Tag property and change it's value to 2.
- Repeat this for digit buttons 3..9.
Now all digit buttons have a unique Tag value. We didn't change digit button 0 because the default Tag value already is 0.
Now to make use if this Tag value:
- Open the form.
- Double click on digit button 0 (this will open the editor in the event handler of digit button 0).
- Note that procedure btnDigit0Click has a parameter Sender of type TObject.
procedure TForm1.btnDigit0Click(Sender: TObject);
The Sender parameter is actually a reference to the button that was pressed. Via typecasting we can use the parameter as if it was a TButton.
- Change the code like this:
procedure TForm1.btnDigit0Click(Sender: TObject);
begin
  AddDigit(TButton(Sender).Tag)
end;
It doesn't look like we have accomplished much, replacing one line of code with another. However if we were to add the code for the other digits (1..9) it would look exactly the same. So all other digits can reuse this particular method!
Let's have a closer look at the [IDE Window: Object Inspector|Object Inspector]].
- Open the form.
- Select digit button 0 (btnDigit0).
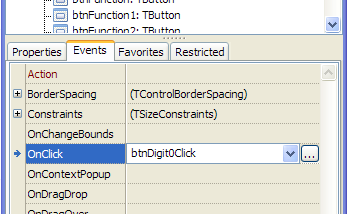
- In the Object Inspector select tab Events (see below).
In the object inspector we can not only change the properties of a control but also the event handlers. In the Object Inspector we can see that as soon as digit button 0 is clicked, method btnDigit0Click is called (this is the OnClick event handler).
- On the form: select digit button 2. In the Object Inspector we can now see that there is no OnClick event handler for button 2.
- Open the drop down list for the OnClick event and select btnDigit0Click.
- Do this for all other digit buttons 3..9.
Now all buttons share one common procedure that does exactly what we want except for digit button 1. Remember that for digit button 1 we created an event handler btnDigit1Click that we don't really need anymore.
- On the form: select digit button 1. In the Object Inspector we can now see that the event handler indeed is btnDigit1Click.
- Open the drop down list for the OnClick event and select btnDigit0Click.
Now all buttons share the same event handler to add digits to the display box.
- Run the program (press F9).
- Click all buttons 0..9 a couple of times and see that it actually works.
- End the program.
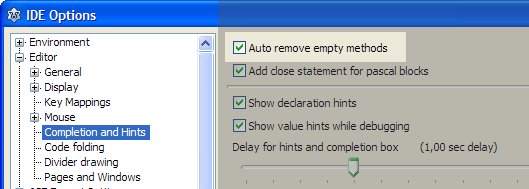
For the digit buttons one final thing needs to be done: event handler btnDigit1Click still exists but is not used anymore and should be deleted. The safest way to do this (for now) is to let the IDE handle it. For this to work the option Auto remove empty methods must be enabled.
- In the menu select Environment/Options.
- Click on Editor/Completion and Hints.
- Enable the option 'Auto remove empty methods' (see image below).
- Press OK.
From now on all empty methods are automatically deleted as soon as the source file is saved.
- Locate method
procedure TForm1.btnDigit1Click(Sender: TObject) - Delete the line 'AddDigit(1)'
- Save the file (press CtrlS or select from the menu File/Save). The now empty procedure is automatically deleted.
Tuning
So far so good: the calculator program compiles, runs and responds to clicks on digit buttons 0..9. But it doesn't behave exactly as we want: there's always this annoying zero at the beginning of the number and the number of allowed digits is too large.
Removing leading zeroes
Normally an integer number that's bigger (or smaller) than zero does not start with a leading zero. So our calculator should compensate for this. Luckily this is easy to implement. Remember that we have one and only one method that handles the addition of digits: AddDigit. This is the place to add logic to suppress the leading zero.
- Locate method procedure TForm1.AddDigit(const pDigit: byte)
- Change the code to:
procedure TForm1.AddDigit(const pDigit: byte);
begin
  // Suppress leading zeroes when adding digits
  if edDisplay.Text = '0' then
    edDisplay.Text := IntToStr(pDigit)
  else
    edDisplay.Text := edDisplay.Text + IntToStr(pDigit)
end;
Limit the number of digits
This demo calculator cannot handle numbers that are too large. So we need to limit the number of digits that can be entered. Again the logical place to do this is the AddDigit method:
- Locate method procedure TForm1.AddDigit(const pDigit: byte)
- Change the code to:
procedure TForm1.AddDigit(const pDigit: byte);
begin
  // Limit the number of digits
  if length(edDisplay.Text) < 8 then
  begin
    // Suppress leading zeroes when adding digits
    if edDisplay.Text = '0' then
      edDisplay.Text := IntToStr(pDigit)
    else
      edDisplay.Text := edDisplay.Text + IntToStr(pDigit)
  end;
end;
Operations
Now it's time to look at the actual operations we want to implement: adding, subtracting, multiplying and dividing. The way the user is going to use the calculator goes something like this:
- The user enters a number
- The user presses a function button (e.g. '+')
- The user enters a second number
- The user presses '='
- The program responds with the addition of the first and second number
As soon as the user presses the '=' button the program has to know three things:
- What was the operation?
- What was the first number?
- What was the second number?
What was the operation?
Somehow we need to register that a certain operation type was selected. And for that we need to know what operation types are available. One way to implement this is to create an enumeration type (or user defined scalar type) that contains all valid operations.
- In the Source Editor, find the location where the form is declared.
- Just above the form add the type declaration TOperationType for all supported operations:
  { All supported operations for our calculator }
  TOperationType = (otNone, otPlus, otMinus, otMultiply, otDivide);

  { TForm1 }

  TForm1 = class(TForm)
- To temporarily store the operation, a variable is added to the
privatesection of the form's class declaration.
  private
    { private declarations }
    SelectedOperation: TOperationType;
    procedure AddDigit(const pDigit: byte);
What was the first number?
To temporarily store the first number that was entered we need a variable.
- Add a variable to the form's
privatesection.
  private
    { private declarations }
    SelectedOperation: TOperationType;
    FirstNumber: longint;
    procedure AddDigit(const pDigit: byte);
What was the second number?
- Add variable SecondNumber to the form's
privatesection (the same as FirstNumber) and make it a longint as well.
What's on your mind
Now it's time to implement the actions for the function buttons: add, subtract, multiply and divide. Let's start with the '+' button. As mentioned in one of the previous sections: when the '+' button is pressed, we need to store the first number and the operation type. So that's what we are going to do.
- Open the form.
- Double click on button '+'. The IDE creates an event handler and the text cursor is placed inside the empty begin/end block.
Hold on! Before adding all the code here and doing the same for the three other operation buttons, remember what was said when the digit buttons 0..9 were added: do not add redundant code! It's reasonable to assume that the code for the other three operation buttons will be the same as for the '+' button, except for the operation itself. So let's save ourselves some work.
- Locate the form's
privatesection and add a new procedure: StoreOperation.
  private
    { private declarations }
    SelectedOperation: TOperationType;
    FirstNumber: longint;
    SecondNumber: longint;
    procedure AddDigit(const pDigit: byte);
    procedure StoreOperation(const pOperation: TOperationType);
- Place the blinking text cursor on the newly inserted line.
- Press Ctrl⇧ ShiftC (you know the drill by now…).
The StoreOperation procedure must do two things: store the operation and store the number that was entered in the display, so it can be used afterwards.
- Add the following code to the newly created procedure:
procedure TForm1.StoreOperation(const pOperation: TOperationType);
begin
  // Store the operation so it can be used later
  SelectedOperation := pOperation;

  // Store the number that was entered by the user
  FirstNumber := StrToInt(edDisplay.Text);
end;
Ok, now back to the '+' button:
- Open the form.
- Double click on button '+'.
- Add the following code: StoreOperation(otPlus);
- Open the form.
- Double click on button '-'.
- Add the following code: StoreOperation(otMinus);
- Open the form.
- Double click on button '*'.
- Add the following code: StoreOperation(otMultiply);
- Open the form.
- Double click on button '/'.
- Add the following code: StoreOperation(otDivide);
Now test the program and see what happens:
- Run the program (press F9)
- Enter a number (e.g. 21267)
- Press the '+' button
- Enter the second number (e.g. 31170)
What happens is that after pressing the '+' button, or any other operation button for that matter, the display is not cleared. We must find a way to make sure that the display is cleared, as soon as an operation button is pressed. Because we have used procedures to group similar actions, this again is an easy change.
- Locate the form's
privatesection and add a new variable: doClearDisplay. This variable will be the trigger for erasing the display.
  private
    { private declarations }
    SelectedOperation: TOperationType;
    FirstNumber: longint;
    SecondNumber: longint;
    doClearDisplay: boolean;
    procedure AddDigit(const pDigit: byte);
    procedure StoreOperation(const pOperation: TOperationType);
- Position the blinking text cursor on the line StoreOperation.
- Press Ctrl+⇧ Shift+↓: this moves the cursor to the body of the StoreOperation procedure.
- In the StoreOperation procedure we must update the doClearDisplay variable, so we know that the display must be cleared as soon as a new number is entered. Change the code to this:
procedure TForm1.StoreOperation(const pOperation: TOperationType);
begin
  // Store the operation so it can be used later
  SelectedOperation := pOperation;

  // Store the number that was entered by the user
  FirstNumber := StrToInt(edDisplay.Text);

  // The display must start with a new number
  doClearDisplay := true;
end;
- And where better to clear the display than in the AddDigit procedure? Change the code to:
procedure TForm1.AddDigit(const pDigit: byte);
begin
  // Must the display be cleared first?
  if doClearDisplay then
  begin
    edDisplay.Text := '0';   // Reset the display to zero
    doClearDisplay := false; // Once is enough...
  end;

  // Limit the number of digits
  if length(edDisplay.Text) < 8 then
  begin
    // Suppress leading zeroes when adding digits
    if edDisplay.Text = '0' then
      edDisplay.Text := IntToStr(pDigit)
    else
      edDisplay.Text := edDisplay.Text + IntToStr(pDigit)
  end;
end;
Now let's see what happens:
- Run the program (press F9).
- Enter a number.
- Press an operation button.
- Enter another number.
- End the program.
We're almost there: we can enter numbers and select an operation. Now it's time to do the actual calculations.
Doing the math
Now that we have stored a number and an operation, it's time to do the actual calculations. Let's start easy with additions.
- Open the form.
- Double click on button '=' (the event handler is created).
- Change the procedure:
procedure TForm1.btnCalculateClick(Sender: TObject);
var result: longint;
begin
  case SelectedOperation of
    otPlus: begin
              // Retrieve the second number
              SecondNumber := StrToInt(edDisplay.Text);
              // Do the math
              result := FirstNumber + SecondNumber;
              // Display the resulting value
              edDisplay.Text := IntToStr(result);
            end;
  end;
end;
The above code is pretty straightforward: if the user presses the '+' button, the first and second number are added up and the result is stored in the edit control on screen. It's good to note that the code uses the case of switch control structure.
We now have a working calculator (that can only add two numbers):
- Run the program (press F9).
- Enter a number.
- Press '+'
- Enter another number.
- Press '=' : the sum of the two numbers is displayed.
- End the program.
We now could add the 3 missing operations ('-', '*' and '/'). But hold on, there is room for improvement. Let's have a look at the following statement:
SecondNumber := StrToInt(edDisplay.Text);
We have seen such a statement before: the StoreOperation procedure contains something similar:
FirstNumber := StrToInt(edDisplay.Text);
Calculating the number the user entered now happens in two different locations. We do not want to repeat ourselves so it's a good idea to create a new function that does the calculation.
- Locate the form's
privatesection and add a new function: GetDisplayValue.
  private
    { private declarations }
    SelectedOperation: TOperationType;
    FirstNumber: longint;
    SecondNumber: longint;
    doClearDisplay: boolean;
    procedure AddDigit(const pDigit: byte);
    procedure StoreOperation(const pOperation: TOperationType);
    function GetDisplayValue: longint;
- Position the blinking text cursor on the line GetDisplayValue.
- Press Ctrl-⇧ Shift-C.
- Add this code to extract the value that is in the display field:
function TForm1.GetDisplayValue: longint;
begin
  result := StrToInt(edDisplay.Text);
end;
- Locate the statement: FirstNumber := StrToInt(edDisplay.Text);
- Change it to: FirstNumber := GetDisplayValue;
So much for refactoring, back to the calculations.
- Locate the statement: SecondNumber := StrToInt(edDisplay.Text);
- Change it to: SecondNumber := GetDisplayValue;
Now look at the following statements:
              // Retrieve the second number
              SecondNumber := GetDisplayValue;
              // Do the math
              result := FirstNumber + SecondNumber;
Variable SecondNumber is used to store the value in the display box. However it is not really necessary. The above code can be simplified:
              // Do the math
              result := FirstNumber + GetDisplayValue;
Now look at the following statements:
              // Do the math
              result := FirstNumber + GetDisplayValue;
              // Display the resulting value
              edDisplay.Text := IntToStr(result);
The same now applies to the result variable. The above code can be simplified to:
              // Display the resulting value
              edDisplay.Text := IntToStr(FirstNumber + GetDisplayValue);
Now we can add the 3 remaining operations.
- Open the form.
- Double click on button '=' (the event handler is created).
- Change the code:
procedure TForm1.btnCalculateClick(Sender: TObject);
begin
  case SelectedOperation of
    otPlus     : edDisplay.Text := IntToStr(FirstNumber + GetDisplayValue);
    otMinus    : edDisplay.Text := IntToStr(FirstNumber - GetDisplayValue);
    otMultiply : edDisplay.Text := IntToStr(FirstNumber * GetDisplayValue);
    otDivide   : edDisplay.Text := IntToStr(FirstNumber div GetDisplayValue);
  end;
end;
We now have a working calculator for all 4 operations:
- Run the program (press F9).
- Enter a number.
- Press an operation button.
- Enter another number.
- Press '=' : the result is displayed.
- End the program.
Intermezzo
After all this work we now have a useable calculator. But some things are not quite right. The obvious thing to try is dividing a number by zero. And the buttons 'C' and '+/-' don't work yet. These things will be addressed in the next section.
First let's add another procedure, just for the fun of it (well, there's more to it of course:-)):
- Locate the form's
privatesection and add a new procedure: SetDisplayValue.
  private
    { private declarations }
    SelectedOperation: TOperationType;
    FirstNumber: longint;
    SecondNumber: longint;
    doClearDisplay: boolean;
    procedure AddDigit(const pDigit: byte);
    procedure StoreOperation(const pOperation: TOperationType);
    function GetDisplayValue: longint;
    procedure SetDisplayValue(const pValue: longint);
- Position the blinking text cursor on the line SetDisplayValue.
- Press Ctrl-⇧ Shift-C.
- Add the code below to give the display a new value, as the procedure name suggests:
procedure TForm1.SetDisplayValue(const pValue: longint);
begin
  edDisplay.Text := IntToStr(pValue);
end;
The above code should look pretty familiar. Have a look at the procedure that does all calculations:
procedure TForm1.btnCalculateClick(Sender: TObject);
begin
  case SelectedOperation of
    otPlus     : edDisplay.Text := IntToStr(FirstNumber + GetDisplayValue);
    otMinus    : edDisplay.Text := IntToStr(FirstNumber - GetDisplayValue);
    otMultiply : edDisplay.Text := IntToStr(FirstNumber * GetDisplayValue);
    otDivide   : edDisplay.Text := IntToStr(FirstNumber div GetDisplayValue);
  end;
end;
This procedure can now be simplified.
- Change the code to:
procedure TForm1.btnCalculateClick(Sender: TObject);
begin
  case SelectedOperation of
    otPlus     : SetDisplayValue(FirstNumber + GetDisplayValue);
    otMinus    : SetDisplayValue(FirstNumber - GetDisplayValue);
    otMultiply : SetDisplayValue(FirstNumber * GetDisplayValue);
    otDivide   : SetDisplayValue(FirstNumber div GetDisplayValue);
  end;
end;
Loose ends
There's a couple of things that need to be done: implement the two loose buttons and make the calculator a bit more robust.
The +/- button
- Open the form.
- Double click on button '+/-' (the event handler is created).
- Add the following code:
procedure TForm1.btnPlusMinusClick(Sender: TObject);
begin
  SetDisplayValue(0 - GetDisplayValue);
end;
See here the fruits of our labor. We have reused the procedure SetDisplayValue and GetDisplayValue to implement the negate function.
Try it by running the program and press the '+/-' button.
The Clear button
- Open the form.
- Double click on button 'C' (the event handler is created).
- Add the following code:
procedure TForm1.btnClearClick(Sender: TObject);
begin
  SetDisplayValue(0);          // Start from scratch
  SelectedOperation := otNone; // No operation selected yet
  doClearDisplay := false;     // The display is already cleared
end;
The above code is pretty self-explanatory: the display is cleared (the first line), we 'forget' about any pending operation by clearing the SelectedOperation variable and there is no need to clear the display when adding new digits, because it was already cleared by the first statement.
Divide by zero
Let's go crazy: run the application and try to divide 10 by 0. This will make the application crash horribly. We have to make sure that this will not happen. The place to check this of course is the place where all calculations are performed (TForm1.btnCalculateClick).
- Open the form.
- Double click on button '='.
- Update the otDivide section:
procedure TForm1.btnCalculateClick(Sender: TObject);
begin
  case SelectedOperation of
    otPlus     : SetDisplayValue(FirstNumber + GetDisplayValue);
    otMinus    : SetDisplayValue(FirstNumber - GetDisplayValue);
    otMultiply : SetDisplayValue(FirstNumber * GetDisplayValue);
    otDivide   : begin
                   if GetDisplayValue <> 0 then
                     SetDisplayValue(FirstNumber div GetDisplayValue)
                   else
                     begin
                       // Display an error message to the user
                       MessageDlg('It is not possible to divide a number by 0!', mtWarning, [mbCancel],0);
                       // Reset the calculator to start with a clean slate
                       btnClearClick(nil);
                     end
                 end
  end;
end;
Things to note:
- MessageDlg is a function for displaying a short warning/error/informative message to the user. ShowMessage can also be used. It is a bit easier to use but cannot display warning/error icons.
- btnClearClick(nil): as soon as an error condition occurs we must reset the calculator. That's basically the same as pressing the 'C' button. We simulate pressing the 'C' button by directly calling the event handler.
Overflows
- Start the calculator
- Enter 99999999 as the first number (8 digits)
- Press button '*'
- Enter 99999999 as the second number
- Press button '='
Now two things could have happened:
- The application gives an incorrect result (something like 1674919425).
- The application raises an error.
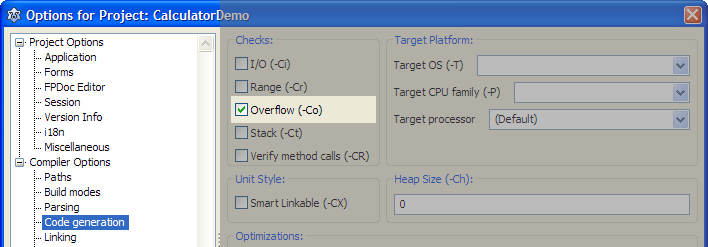
If it's the first option then overflow errors have been disabled for the project. Enable them by ticking the Overflow option box:
- Select from the menu Project/Project Options…
- Select in the treeview Compiler Options/Code Generation.
- Tick the box Overflow (-Co) (see image below).
- Click OK.
Now run the program again and see what happens with overflows.
If it was the second (and expected) option then this means we have to add exception handling to our little calculator. Exception handling is used to prevent an application from crashing when errors occur. In our case we want to handle the arithmetic overflow error that might occur. Because all calculations are done in one place, it's easy to catch any overflow errors.
- Open the form.
- Double click on button '='.
- Change the code in the procedure to this:
procedure TForm1.btnCalculateClick(Sender: TObject);
begin
  // Catch any overflow errors
  try
    case SelectedOperation of
      otPlus     : SetDisplayValue(FirstNumber + GetDisplayValue);
      otMinus    : SetDisplayValue(FirstNumber - GetDisplayValue);
      otMultiply : SetDisplayValue(FirstNumber * GetDisplayValue);
      otDivide   : begin
                     if GetDisplayValue <> 0 then
                       SetDisplayValue(FirstNumber div GetDisplayValue)
                     else
                       begin
                         // Display an error message to the user
                         MessageDlg('It is not possible to divide a number by 0!', mtWarning, [mbCancel],0);
                         // Reset the calculator to start with a clean slate
                         btnClearClick(nil);
                       end
                   end
    end;
  except
    on E: EIntOverflow do
      begin
        // Display an error message
        MessageDlg('The result of the calculation was too big for the calculator to process!', mtWarning, [mbCancel], 0);
        // Reset the calculator
        btnClearClick(nil);
      end
  end
end;
Note that even with the exception handling in place, the application will still halt when run from inside the IDE. However the application is only paused and still active. Press F9 to continue. This will display another pop up window, a debugger notification window. Press Continue. Now our own exception handler will kick in with the expected message.If you were to run the application stand alone (i.e. outside the IDE) then you would only see the message box that we added to the exception handler.
Final tweaks
Remember that at a certain point a variable called SecondNumber was introduced. If you choose Run/Build All from the menu, then after building the application the compiler will display a message in the Messages window that this particular variable is never used. If you click on the message text the IDE opens the exact location in the editor where the variable is declared.
- Click on message Note: Private field "TForm1.SecondNumber" is never used.
- Delete longint variable SecondNumber.
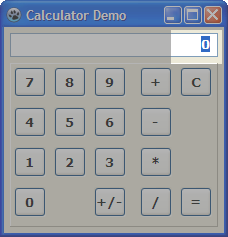
As soon as our demo Calculator is started we see that the number 0 in the display has the focus (see image below).
This is counter intuitive because a user should not be able to enter anything in that box. Even worse as soon as she would type something in there that is not a number, our calculator would crash! So it's better not to give access to the that control at all. We are going to fix that.
- Open the form.
- Select the display control (click on edDisplay).
- In the Object Inspector change ReadOnly to True (if the Events tab is still visible, select the Properties tab first to gain access to all properties). From now on it's impossible to enter any data manually.
- Change TabStop to False. Now it's impossible to get to the display field via the keyboard and the display field will not be highlighted anymore.
Run the program to see the result of these changes.
(Under construction: OO-ify the program)

