Daemons and Services/zh CN
│
English (en) │
español (es) │
français (fr) │
polski (pl) │
português (pt) │
русский (ru) │
中文(中国大陆) (zh_CN) │
守护进程、服务和代理的概念
Unix 中的“守护进程”和 Windows 中的“服务”是系统级程序,运行时无需用户交互;macOS 中的“代理”是用户级程序(相对系统级的守护进程而言),运行时有无用户交互均有可能。尽管叫法不同,但他们的功能类似:比如 www 或 ftp 服务在 Linux 下称作守护进程,而在 Windows 下则叫服务。由于不直接与用户交互,因此在启动时会关闭stdin、stdout、stderr 描述符。
在 Free Pascal 和 Lazarus 中,可以利用 Lazarus 的 lazdaemon 包以平台无关的方式编写守护进程/服务。为避免与 Delphi 组件命名冲突,这些类命名为“daemon”。
用 Lazarus 和可视化组件创建服务/守护进程
前提:安装 LazDaemon 包
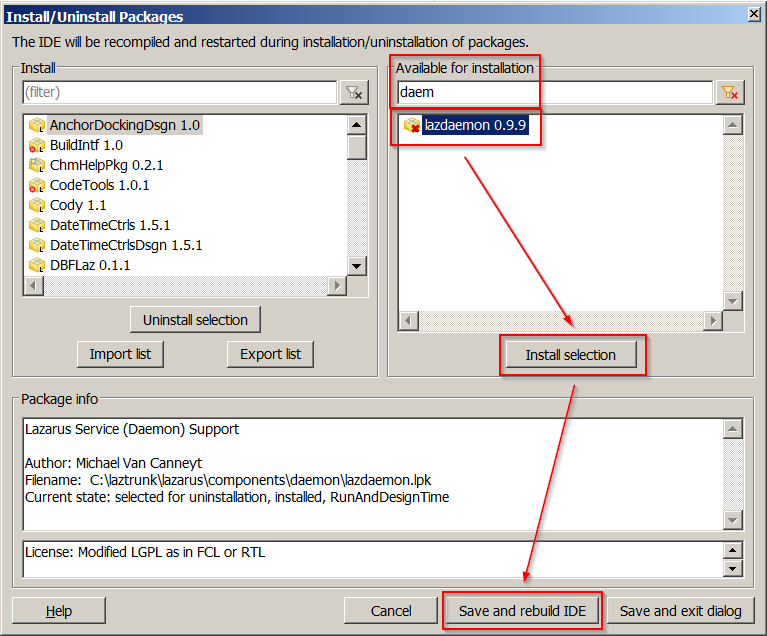
在开始使用 Lazarus IDE 创建守护进程之前,必须通过“软件包”-“安装/卸载软件包”安装 LazDaemon 包,或者直接从.../lazarus/components/daemon/lazdaemon.lpk 安装 lpk 文件。
LazDaemon 包会在 IDE 中安装一些新的组件和菜单。
鉴于 Lazarus 软件包的工作方式,安装 LazDaemon 包需要“保存并重新构建IDE”。
创建并使用 Daemon 项目框架
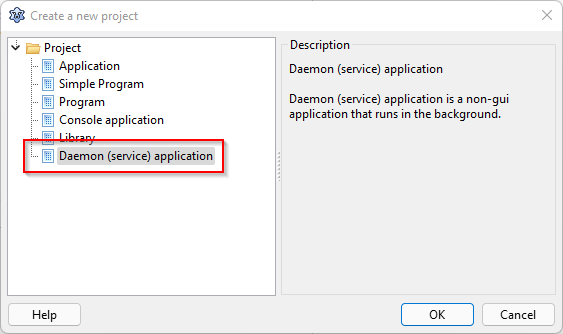
LazDaemon 包安装完成后,从“项目-新建项目”菜单选择“守护进程(服务)应用”。
这会自动创建两个单元,一个派生自 TDaemon(DaemonUnit),另一个派生自 TDaemonMapper(DaemonMapperUnit)。以及一个主项目文件(TestDaemon.lpr),需要稍作修改才能使用:
Program TestDaemon;

Uses

// This is the scaffolded code, needs modification like shown below,
// since UseCThreads is usually not definied, and is not needed here
// {$IFDEF UNIX}{$IFDEF UseCThreads}
//  CThreads,
// {$ENDIF}{$ENDIF}

{$IFDEF UNIX}
  CThreads,
{$ENDIF}
  DaemonApp, lazdaemonapp, daemonmapperunit, DaemonUnit
  { add your units here };

{$R *.res}

begin
  Application.Initialize;
  Application.Run;
end.
Warning: 自动生成的 .lpr 文件中多了一条 {$IFDEF UseCThreads} ... {$ENDIF} 子句(上述示例中已被注释掉了),据观察,除非另作定义 UseCThreads,否则这个子句无法工作。可整句删除也可如上所示注释掉,或者在 Linux 下编译守护进程时添加 -dUseCThreads 选项。编写 Windows 服务不受影响。
守护进程虽然没有 GUI,但 DaemonApp 和 DaemonMapper 单元都支持 Lazarus 窗体编辑器。这样就可以用熟悉的图形界面来设置守护进程和映射类的各种属性。当然,也可以完全用代码初始化所有属性,如下所示。
自动生成的 DaemonApp 和 DaemonMapper 单元中都有多余的“var”定义(var DaemonMapper1: TDaemonMapper1; var Daemon1: TDaemon1;)。这两个变量在守护进程运行时并未实际用到,依然保持未初始化状态,对他们进行访问会导致致命错误 access violation。只要进一步了解了守护进程应用的内部工作原理,就会发现代码只与类相关(TDaemonMapper1、TDaemon),这两个变量完全可忽略或删除。
TDaemon 类的代码主要用于响应操作系统发送的各种控制消息。TDaemonMapper 包含了描述服务的一些数据结构。这两个类都需要在守护进程应用框架中注册,将在守护进程启动时供内部使用,完成对守护进程的配置。在以下示例中,注册是在单元的“Initialization”部分完成的。
只要在单元的 uses 部分加入 DaemonApp,即可引入守护进程类应用的主“Application”对象。守护进程应用的“Application”提供了完整的服务框架,包括安装和卸载、记录日志之类的高级功能。守护进程的“工作线程”需要自行创建,可参阅后续的示例代码,请勿使用 TDaemon 类的“Execute”方法。
发布 DaemonMapper 类
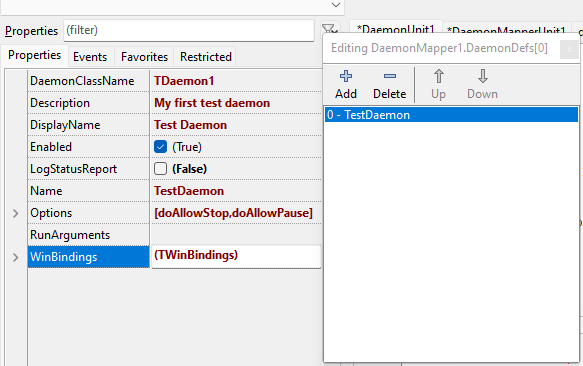
下面先填充一些基本属性,让程序跑起来。请注意,DaemonClassName 必须与 DaemonClass 单元中定义的类名完全一致。
不妨简单介绍一下 WinBindings 属性,即可通过 Windows 服务管理器配置各种服务属性,例如启动类型和用户帐户。虽然这个简单的守护应用中并未用到,但对于真正的守护进程应用程序而言,合理设置这些选项非常重要。WinBindings 在 Linux 中无效,请参阅关于 Linux 安装和卸载功能的章节,了解如何在 systemd “单元”(.service)文件中设置选项,以便为 Linux 实现相同的功能。
编写守护进程的方法
TDaemons 支持以下方法:
| 方法/事件 | 说明 | ||
|---|---|---|---|
OnStart
|
守护进程将启动时调用。本方法必须立即返回并置 OK:=True。 | ||
OnStop
|
守护进程将停止时调用。本方法必须立即返回并置 OK:=True。 | ||
OnShutDown
|
守护进程将被杀掉时调用,因为系统将要关闭。本方法必须立即停止守护进程,并置 OK:=True返回。本方法在 Linux 系统中不会触发。Linux 会直接杀掉守护进程。 | ||
OnPause
|
守护进程将暂停时调用。本方法必须立即返回并置 OK:=True。本方法在 Linux 系统中不会触发,系统内核会停止整个守护进程并触发 OnStop 事件。 | ||
OnContinue
|
- | OnExecute
|
不要用本方法实现工作线程,请参考示例代码实现工作线程的任务。 |
BeforeInstall
|
服务即将安装时调用。 | ||
AfterInstall
|
服务安装成功后调用。 | ||
BeforeUninstall
|
服务卸载前调用。 | ||
AfterUninstall
|
服务卸载完成后调用。 |
以下代码片段展示了成功实现简单守护进程所需的主要事件处理程序。已在 Windows 7/10/11 和几个 Linux 版本(Debian 10.8 和 Ubuntu 20.04.3)中测试通过。
有些便利性辅助函数已剥离至单独的单元中,以防扰乱守护进程的核心代码。
- FileLoggerUnit:线程安全的记录日志文件的辅助工具。日志是必需记录的,因为 TDaemon 应用的控制信号接收器和服务代码需运行于单独的线程,否则服务代码运行时守护进程将无法响应控制信号。因此,在守护进程中至少涉及两个任务,这两个任务同时访问日志文件时可能会发生冲突。关于如何运用 TRTLCriticalSection 保证代码线程安全,实现对单一资源的串行访问,详情请参阅 Lazarus 维基的多线程应用开发教程。FileLoggerUnit 会将日志文件写入程序所在目录,请确保程序拥有写入权限。这里的代码会每天写一个文件,文件名包含创建日期。如果需要更高级的日志记录工具,可以考虑使用 LazLogger 单元。
- DaemonWorkerThread:TThread 的派生类,可容纳守护进程的“工作”代码。关于 TThread.Execute 方法,其中不可避免包含了“无限”循环,详情请参阅 Lazarus 维基的多线程应用开发教程。由 TDaemon 启动的工作线程并没有什么特别的,就和其他线程一样。
- [https://gitlab.com/freepascal.org/lazarus/lazarus/-/tree/main/examples/TDaemon DaemonSystemdInstallerUnit:该单元为 Linux 系统提供 -install 和 -uninstall 命令行参数支持。通过对 /lib/systemd/system 写入相应的控制文件,加入对 systemd/systemctl 的支持。
启动/停止信号的处理
// ---------------------
// 启动和停止信号
// ---------------------

procedure TDaemon1.DataModuleStart(Sender: TCustomDaemon; var OK: Boolean);
begin
  LogToFile(Format('Daemon received start signal, PID:%d', [GetProcessID]));
  // 创建挂起的工作线程 - 参见 DaemonWorkerThread 单元
  FDaemonWorkerThread := TDaemonWorkerThread.Create;
  // 设置参数
  FDaemonWorkerThread.FreeOnTerminate := False;
  // 启动工作线程
  FDaemonWorkerThread.Start;
  OK := True;
end;

procedure TDaemon1.DataModuleStop(Sender: TCustomDaemon; var OK: Boolean);
begin
  LogToFile('Daemon received stop signal');
  // 停止并销毁工作线程
  if assigned(FDaemonWorkerThread) then
  begin
    FDaemonWorkerThread.Terminate;
    // 等待线程停止
    FDaemonWorkerThread.WaitFor;
    FreeAndNil(FDaemonWorkerThread);
  end;
  LogToFile('Daemon stopped');
  OK := True;
end;
上述代码负责处理操作系统发出的启动和停止信号。守护进程启动时,将会调用 DataModuleStart,生成 DaemonWorkerThread 单元定义的“工作”线程,至于守护进程的实际工作代码请参阅 TDeamonWorkerThread.Execute 方法。对线程代码的理解,可参考多线程应用开发教程和 TThread 的文档。
Warning: 编写守护进程的代码时,或许有人想在 TDaemon 的“execute”方法中实现处理过程。但这样的运行效果并不理想,特别是在 Windows 系统中。因为 Execute 方法并不会作为单独的线程运行,在其运行期间守护进程会停止处理控制消息。于是,守护进程可以启动并正常运行,但要用 Windows 服务管理器或 sc 命令来停止/暂停/恢复时,守护进程将不会响应,就像被挂起了一样。
关机消息的处理
此处的处理代码仅适用于 Windows 系统,当操作系统关闭时用于停止守护进程。如果不做处理,Windows 会直接强行杀死守护进程,已打开的文件可能会遭到损坏。下面演示的服务较为简单,可直接调用 DataModuleStop 事件处理程序,执行正常停止服务的代码。Linux 系统不支持关机消息的处理,而会直接调用停止服务的处理代码。
procedure TDaemon1.DataModuleShutDown(Sender: TCustomDaemon);
// 仅 Windows 系统支持
begin
  self.Stop;   // 系统关机时调用停止服务的处理代码。对于本演示程序而言完全够用了。
  LogToFile('Daemon received shutdown signal');
end;
Linux 下的安装和卸载(systemd)
LazDaemon 中内置的安装和卸载功能(通过 -install 和 -uninstall 命令行参数)仅适用于 Windows。以下给出了简单的示例代码,展示了如何为安装和卸载事件创建自定义处理过程,以便添加 Linux 下的类似功能。
// --------------------------------
// Installation and De-Installation
// --------------------------------

procedure TDaemon1.DataModuleAfterInstall(Sender: TCustomDaemon);

  var
  isInstalled: boolean = True;
  FilePath: string;

begin
  LogToFile('Daemon installing');
  {$IFDEF UNIX}
  FilePath := GetSystemdControlFilePath(Self.Definition.Name);
  isInstalled := CreateSystemdControlFile(self, FilePath);
  if not isInstalled then
    LogToFile('Error creating systemd control file: ' + FilePath);
  {$ENDIF}
  if isInstalled then
    LogToFile('Daemon installed');
end;

procedure TDaemon1.DataModuleBeforeUnInstall(Sender: TCustomDaemon);
  var
    isUnInstalled: boolean = True;
    FilePath: string;

  begin
    LogToFile('Daemon uninstalling');
    {$IFDEF UNIX}
    FilePath := GetSystemdControlFilePath(Self.Definition.Name);
    isUnInstalled := RemoveSystemdControlFile(FilePath);
    if not isUninstalled then
      LogToFile('Error removing systemd control file: ' + FilePath);
    {$ENDIF}
    if isUninstalled then
      LogToFile('Daemon uninstalled');
  end;
上述处理代码仅适用于 Unix/Linux 系统,利用 DaemonSystemdInstallerUnit 中的函数建立一个 systemd 控制文件(.service 文件),并放入 /lib/systemd/system 目录,以便用 systemctl 命令来控制守护进程。在卸载守护进程时,将会删除此 .service 文件。
如果 .service 文件中未指定用户账户,systemd 将会以 root 身份运行此守护进程。出于安全考虑,以“root”(Linux)或“LocalSystem”(Windows)身份运行守护进程不是个好习惯,可能会带来很多其他障碍,其中之一就是难以调试正在运行的守护进程。可以考虑在 DaemonSystemdInstallerUnit.CreateSystemdControlFile 中加入指定用户的代码:
    [...]
    f.WriteString('Service', 'Type', 'simple');
    f.WriteString('Service', 'User', '...');   // insert a service account here, otherwise the daemon will run as root
    f.WriteString('Service', 'ExecStart', Application.ExeName + ' -r');
    [...]
若要全面了解 systemd .service 文件(有时也称为 systemd“单元文件”)中所有可用设置,请参阅 Linux 的发行文档。
工作线程
守护进程的主要内容都有一段执行实际工作的代码,这里称作“工作”线程。因为守护进程要继续在后台监听控制消息并作出处理,所以工作线程需为单独的线程。上述 TDaemon.DataModuleStart 和 TDaemon.DataModuleStop 例程已给出了工作线程的创建和销毁代码。
procedure TDaemonWorkerThread.Execute;

var
  i: integer;

begin
  LogToFile('Daemon worker thread executing');
  while not Terminated do
  begin
    // 以下仅为占位代码,请在此插入实际的服务代码
    // ...
    LogToFile('Daemon worker thread running');
    // 线程和 CPU 负载都不高的延时5秒循环
    for i := 1 to 50 do
    begin
      if Terminated then break;
      Sleep(100);
    end;
    // ...
    // ----------------------------------------
  end;
  LogToFile('Daemon worker thread terminated');
end;
上述工作线程没有太多任务,只是循环至线程终止,每5秒在日志中写入消息。
将两个“...”之间的代码替换掉,即可实现自己的守护进程功能。
TThread.Execute 方法的内部循环必须以某种方式频繁检查“Terminated”标志。Terminated 标志由 TThread.Terminate 方法设置,正如前文 TDaemon.DataModuleStop 所示,TThread.Terminate 方法用于优雅地结束线程的执行。关于 TThread 的更多信息,请参阅多线程应用开发教程。
为了让示例代码尽量简单,这里没有以任何方式处理运行时错误。记录日志单元的错误将静默忽略,守护进程的其他运行时错误将导致进程崩溃。请参阅异常以总体了解异常的捕获和处理方式,查看 TThread.HandleException 文档以了解在工作线程的 execute 方法中正确捕获和转发异常的方式。
用代码初始化 TDaemon 属性
如果不想用 Lazarus IDE 及其窗体编辑器设置 TDaemon 和 TDaemonMapper 的属性,完全用代码完成也是没问题的。请注意,这时项目不能像其他应用那样基于 LCL/Form 创建,而应该基于 DaemonApp。否则会报大量的流加载错误,代码将无法运行。
前文已介绍了 TDaemon 的用法(事件驱动的守护进程编程),现在的区别只是在代码中要将事件处理过程赋值如下:
TDaemon1 = class(TDaemon)
    {...}
  procedure DataModuleStart(Sender: TCustomDaemon; var OK: Boolean);   // 事件处理过程的示例
    {...}
public
  constructor Create(AOwner: TComponent); override;  // 覆盖构造函数,初始化事件处理过程
end;

{...}

constructor TDaemon1.Create(AOwner: TComponent);
begin
  inherited Create(AOwner);
  {...}
  onStart := @DataModuleStart;   // 赋值示例的事件处理过程
  {...}
end;
TDaemonMapper 的编写方式类似。
以下是 DaemonApp 单元中显示可用属性的部分代码:
  TCustomDaemon = Class(TDataModule)
  private

    [...]

  Protected
    Function Start : Boolean; virtual;
    Function Stop : Boolean; virtual;
    Function Pause : Boolean; virtual;
    Function Continue : Boolean; virtual;
    Function Execute : Boolean; virtual;
    Function ShutDown : Boolean; virtual;
    Function Install : Boolean; virtual;
    Function UnInstall: boolean; virtual;

    [...]
纯代码创建服务/守护进程
TestDaemonCodeOnly 作为演示项目,用到了 TCustomDaemon 和 TCustomDaemonMapper类,并且不依赖 Lazarus IDE。因此,该项目无需 .lpr 或 .lfm 之类的 Lazarus 辅助文件,并且可用任何纯文本编辑器进行维护。该项目并不使用 GUI 核心代码那种事件驱动模式,而是基于 OOP 和继承。至于其他的那些辅助单元则与以上 GUI 示例的相同,包括记录文件日志、守护进程工作线程、基于 Linux systemd 的 -install 和 -uninstall 支持等功能。
Linux 的 -install 和 -uninstall 支持功能,同样由以上示例用到的 DaemonSystemdInstallerUnit 提供。Windows 服务的安装和卸载功能已内置于 DaemonApp 单元中了。TDaemonMapper 类的 WinBindings 属性可用于配置 Windows 服务,Linux 系统中不用此属性也没有效果。DeamonSystemdInstallerUnit 中的代码为 Linux/systemd/systemctl 提供了类似的功能。
Windows 不支持 -run 参数,而是提供了自己的服务控制工具(Windows 服务控制管理器或“sc”命令行工具)。
守护进程的代码需要用多个线程实现,一个用于处理守护进程控制消息,另一个独立线程用于守护进程的“工作”代码。仅仅重写 TCustomDaemon.Execute 方法是不够的,因为守护进程在 TDaemon.Execute 方法中循环时,无法处理控制消息。因此,在 Windows 服务控制管理器中会显示为挂起状态,并且不会响应 sc 命令。“工作”线程的代码与以上 GUI 示例中的相同,并且已在 DaemonWorkerThread 单元中实现。
因为没有了 GUI 和控制台,所以需要用到记录日志功能。TCustomDaemon 对象提供了日志记录功能(通过 EventLog 属性),但不是线程安全的。FileLoggerUnit 提供了简单的线程安全的文件日志记录功能。如果需要更复杂的日志记录功能,可以考虑使用LazLogger单元。
关于多线程的详细信息,以及通过 CriticalSection 保障代码的线程安全,请参阅多线程应用开发教程。
program TestDaemonCodeOnly;

{$mode objfpc}{$H+}

uses
 {$IFDEF UNIX}
  cthreads,
   {$ENDIF}
  Classes,
  SysUtils,
  { you can add units after this }
  DaemonApp,
  FileLoggerUnit,             // 线程安全的文件日志记录工具
  DaemonWorkerThread,         // TThread 的派生类,用于执行守护工作
  DaemonSystemdInstallerUnit; // Linux/systemd 的 -install 和 -uninstall 功能


// ------------------------------------------------------------------
// TDaemonMapper: 定义守护进程的配置
// ------------------------------------------------------------------

type
  TDaemonMapper1 = class(TCustomDaemonMapper)
  public
    constructor Create(AOwner: TComponent); override;
  end;

  constructor TDaemonMapper1.Create(AOwner: TComponent);

  begin
    inherited Create(AOwner);
    with TDaemonDef(self.DaemonDefs.Add) do
    begin
      DaemonClassName := 'TDaemon1';           // 必须与守护进程类名完全一样
      Name := 'TestDaemonCodeOnly';            // 服务名
      DisplayName := 'Test Daemon (CodeOnly)'; // 显示的服务名
      Description := 'Lazarus Daemons and Services Wiki Demo Service (Created in Code only)';
      Options := [doAllowStop, doAllowPause];
      WinBindings.StartType := stManual;  // stBoot, stSystem, stAuto, stManual, stDisabled
      WinBindings.ServiceType := stWin32;
    end;
  end;

// -------------------------------------------------------------------
// TDaemon: 定义守护进程任务,并处理 Windows/Linux 服务管理器的事件
// -------------------------------------------------------------------

type

  { TDaemon1 }

  TDaemon1 = class(TCustomDaemon)
  private
    FDaemonWorkerThread: TDaemonWorkerThread;
  public
    function Start: boolean; override;     // 启动工作线程
    function Stop: boolean; override;      // 停止工作线程
    function Pause: boolean; override;     // 暂停工作线程(仅限 Windows)
    function Continue: boolean; override;  // 回复工作线程(仅限 Windows)
    function ShutDown: boolean; override;  // 由于操作系统关机而停止工作线程
    function Install: boolean; override;   // 在 Linux 下添加 -install 功能
    function UnInstall: boolean; override; // 在 Linux 下添加 -uninstall 功能
  end;

  { TDaemon1 }

  // ------------------------------------------------
  // 启动和停止信号的处理
  // ------------------------------------------------

  function TDaemon1.Start: boolean;
  begin
    // 创建挂起的工作线程 - 参阅 DaemonWorkerThread 单元
    FDaemonWorkerThread := TDaemonWorkerThread.Create;
    // 设置参数
    FDaemonWorkerThread.FreeOnTerminate := False;
    // 启动工作线程
    FDaemonWorkerThread.Start;
    LogToFile(Format('TDaemon1: service %s started, PID=%d', [self.Definition.Name, GetProcessID]));
    Result := True;
  end;

  function TDaemon1.Stop: boolean;
  begin
    // 停止并销毁工作线程
    if assigned(FDaemonWorkerThread) then
    begin
      FDaemonWorkerThread.Terminate;
      // 等待线程终止
      FDaemonWorkerThread.WaitFor;
      FreeAndNil(FDaemonWorkerThread);
    end;
    Result := True;
    LogToFile(Format('TDaemon1: service %s stopped', [self.Definition.Name]));
  end;

// ------------------------------------------------
// 暂停和恢复运行信号的处理(仅限 Windows)
// ------------------------------------------------

  function TDaemon1.Pause: boolean;
  begin
    FDaemonWorkerThread.Suspend;    // 已过时,不过还能用
    LogToFile(Format('TDaemon1: service %s paused', [self.Definition.Name]));
    Result := True;
  end;

  function TDaemon1.Continue: boolean;

  begin
    LogToFile(Format('TDaemon1: service %s continuing', [self.Definition.Name]));
    FDaemonWorkerThread.Resume;    // 已过时,不过还能用
    Result := True;
  end;

// --------------------------------------------------------------
// 操作系统关机时停止信号的处理(仅限 Windows)
// --------------------------------------------------------------

  function TDaemon1.ShutDown: boolean;
  begin
    Result := self.Stop;   // 关机时,触发停止服务的事件处理。 对示例而言足够了。
    LogToFile(Format('TDaemon1: service %s shutdown', [self.Definition.Name]));
  end;

// -----------------------------------------------------------------------------------------
// Linux 下的安装和卸载功能, Windows 下已内置于 TCustomDaemon
// -----------------------------------------------------------------------------------------

  function TDaemon1.Install: boolean;

  var
    FilePath: string;

  begin
    Result := False;
    {$IFDEF WINDOWS}
    Result := inherited Install;
    {$ELSE}
      {$IFDEF UNIX}
      FilePath := GetSystemdControlFilePath(Self.Definition.Name);
      LogToFile(Format('TDaemon1: installing control file: %s',[FilePath]));
      Result := CreateSystemdControlFile(self, FilePath);
      if not Result then
        LogToFile('TDaemon1: Error creating systemd control file: ' + FilePath);
      {$ENDIF}
    {$ENDIF}
    LogToFile(Format('TDaemon1: service %s installed: %s', [self.Definition.Name, BoolToStr(Result, 'ok', 'failure')]));
  end;

  function TDaemon1.UnInstall: boolean;

  var
    FilePath: string;

  begin
    Result := False;
    {$IFDEF WINDOWS}
    Result := inherited UnInstall;
    {$ELSE}
      {$IFDEF UNIX}
      FilePath := GetSystemdControlFilePath(Self.Definition.Name);
      Result := RemoveSystemdControlFile(FilePath);
      if not Result then
        LogToFile('TDaemon1: Error removing systemd control file: ' + FilePath);
      {$ENDIF}
    {$ENDIF}
    LogToFile(Format('TDaemon1: service %s uninstalled: %s', [self.Definition.Name, BoolToStr(Result, 'ok', 'failure')]));
  end;

// ---------------------
// 主程序,包含初始化代码
// ---------------------

begin
  RegisterDaemonClass(TDaemon1);
  RegisterDaemonMapper(TDaemonMapper1);
  Application.Run;
end.
守护进程/服务的安装
Windows
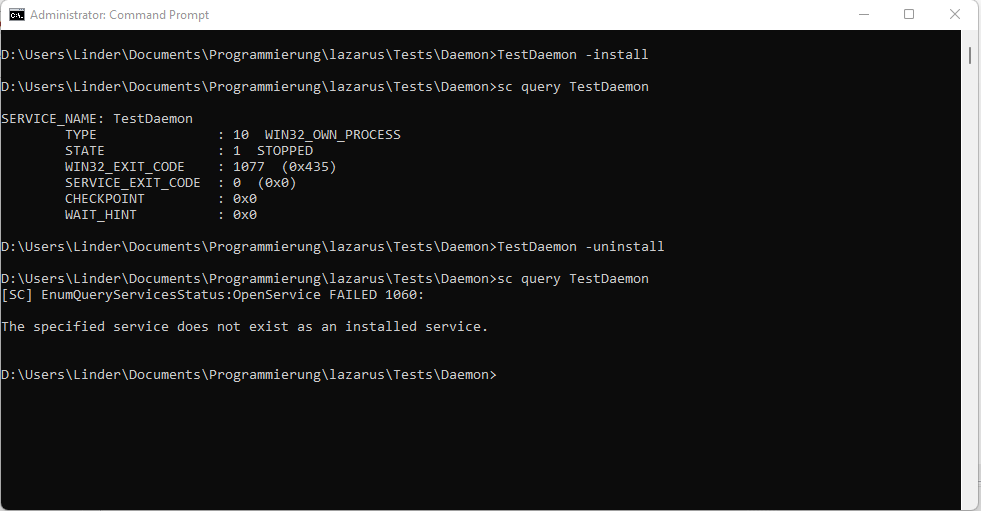
在任一提权后的命令提示符下,只要带 -install 参数启动可执行文件,即可安装服务。
打开一个提权(以管理员身份运行)的终端窗口,进入编译完成的 TestDaemon 所在目录,即可执行以下命令:
| 命令 | 说明 |
|---|---|
TestDaemon -install
|
安装服务 |
sc query TestDaemon
|
查看服务状态 |
sc config TestDaemon start=auto
|
将服务配置为随机器启动而自动运行 |
sc config TestDaemon start=manual
|
将服务配置为手动启动 |
sc config TestDaemon start=disabled
|
禁用服务(无法手动启动) |
TestDaemon -uninstall
|
删除服务 |
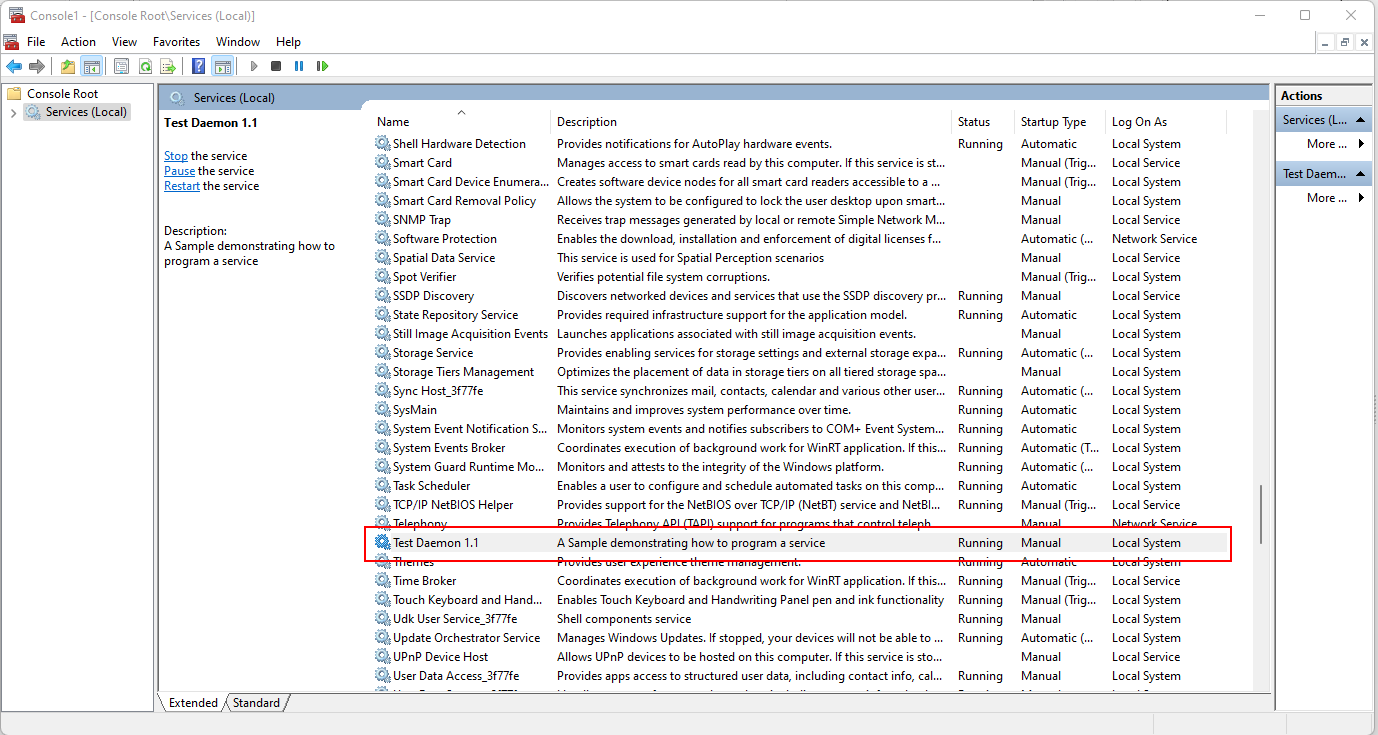
服务安装成功后,可通过 sc 命令行或“服务”管理控制台中的 GUI 对服务进行控制。在较新的 Windows 版本中,任务管理器的“服务”页也提供了基础的服务控制功能。
服务安装后,最重要的 sc 控制命令包括:
| 命令 | 说明 |
|---|---|
sc start TestDaemon
|
启动服务 |
sc query TestDaemon
|
查询服务状态 |
sc stop TestDaemon
|
停止服务 |
也可以使用 Windows 的服务控制管理器。
Linux
与 Windows 不同,TDaemonApp 应用不提供自动安装功能,因为在 Linux/Unix 系统下存在各种各样的服务控制子系统。可在 TCustomDaemon 对象的安装和卸载事件处理过程中实现自己的安装脚本,类似上述代码示例中展示的对 systemd 的支持。如果采用这种方法,那么安装和卸载的过程基本与 Windows 相同。
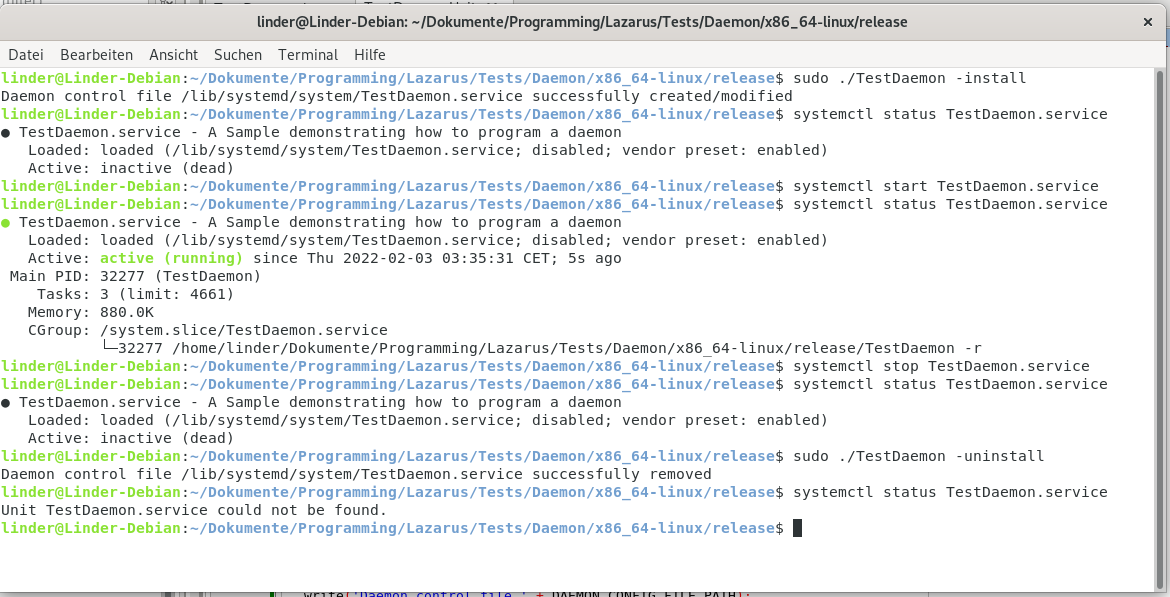
可以在终端中用 sudo 再加 -install 或 -uninstall 参数来启动可执行文件,以便安装或卸载服务:
| 命令 | 说明 |
|---|---|
sudo ./TestDaemon -install
|
安装服务 |
sudo ./TestDaemon -uninstall
|
卸载服务 |
systemctl enable TestDaemon
|
将服务配置为随系统自动启动 |
systemctl disable TestDaemon
|
将服务配置为不随系统自动启动 |
服务安装完成后,可以用 systemctl 命令进行控制:
| 命令 | 说明 |
|---|---|
systemctl start TestDaemon
|
启动服务 |
systemctl status TestDaemon
|
查询服务状态 |
systemctl stop TestDaemon
|
停止服务 |
由命令行参数 -install 触发的 DaemonSystemdInstallerUnit.CreateSystemdControlFile 代码,将会读取 TDaemonMapper 类最为基本的属性,并在 /lib/systemd/system 目录下写入一个简单的 systemd .service 文件,使得守护进程接受 systemd 的控制。若要进行手动操作,可以用任何文本编辑器按照以下模板创建自己的 .service 文件:
[Unit]
Description=Long description of your application
After=network.target

[Service]
Type=simple
User=name_of_a_service_user_account
ExecStart=complete_path_and_file_name -r
RemainAfterExit=yes
TimeoutSec=25

[Install]
WantedBy=multi-user.target
- 请编辑以下内容
- Description - 服务的详细说明
- ExecStart - 编译好的全路径可执行文件名
- User - 指定用户,省略则以 root 身份运行,但强烈不建议以 root 身份运行守护进程
- 保存文件
- 进入 /lib/systemd/system/
- 将文件命名为 name_of_your_service.service
在 DaemonSystemdInstallerUnit.CreateSystemdControlFile 创建的 .service 文件中,还有很多条目可用于自定义 systemd 的控制方式,请参阅 Linux systemd “unit”文件参考手册。
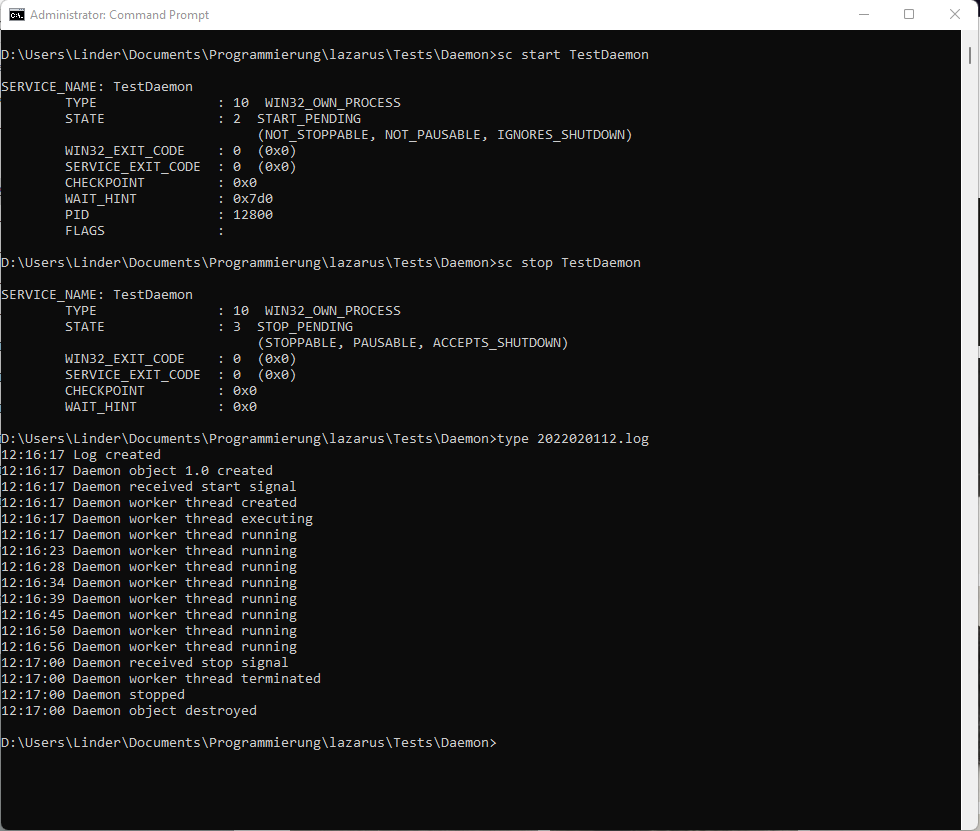
日志文件的读取
以下是个在 Windows 下创建的日志文件示例,显示守护进程运行时的内部状态,在 Linux 下的显示将完全相同。
守护进程/服务的调试
守护进程的调试并不像普通应用程序那么直接,因为运行中的守护进程通常既没有 GUI 也没有控制台,并且其运行/停止状态通常由操作系统管理。Windows 和 Linux 的调试方式也不一样,特别是调试会话的启动方式。一旦将调试进程附加到守护进程并到达第一个断点,后续的操作就与调试其他任何应用一样了,可以直接从 Lazarus GUI 控制调试器和守护进程的源代码。
在开始调试之前,需用“调试”模式编译服务/守护进程的代码,以便插入调试代码并生成相应的调试符号文件(.dbg 文件)。
Windows
在 Windows 中的调试策略取决于要查看哪部分代码:
- 若要调试 -install 或 -uninstall 部分,请在 Lazarus GUI 中将“运行-运行参数”设为 -install 或 -uninstall,设置好断点,然后运行代码[F9]。
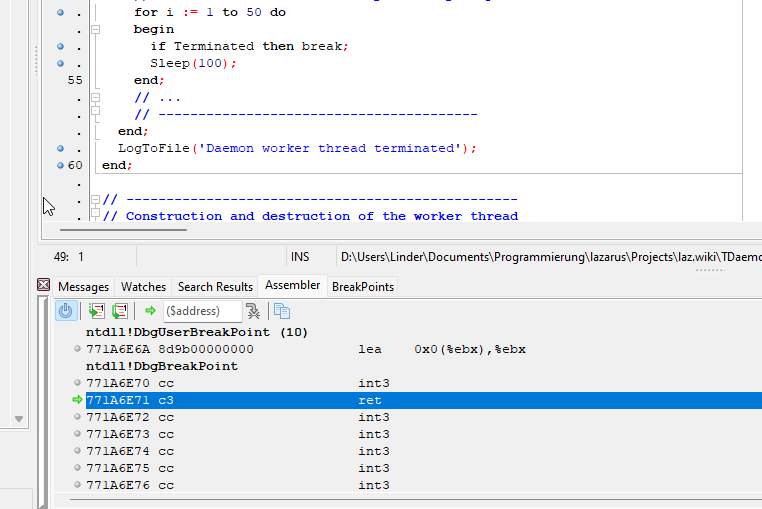
- 若需调试服务的工作线程代码,请通过操作系统(使用 sc 命令或 Windows 服务管理器)启动服务,确定进程ID(PID),然后选择“运行-附加到程序”。一旦附加成功,调试器将自动停止于 ntdll.dll!DbgUserBreakPoint 处预设的临时断点,此时服务将运行于工作线程代码的循环内。在工作线程的代码中设好断点和监视后,用[F9]运行代码继续调试。
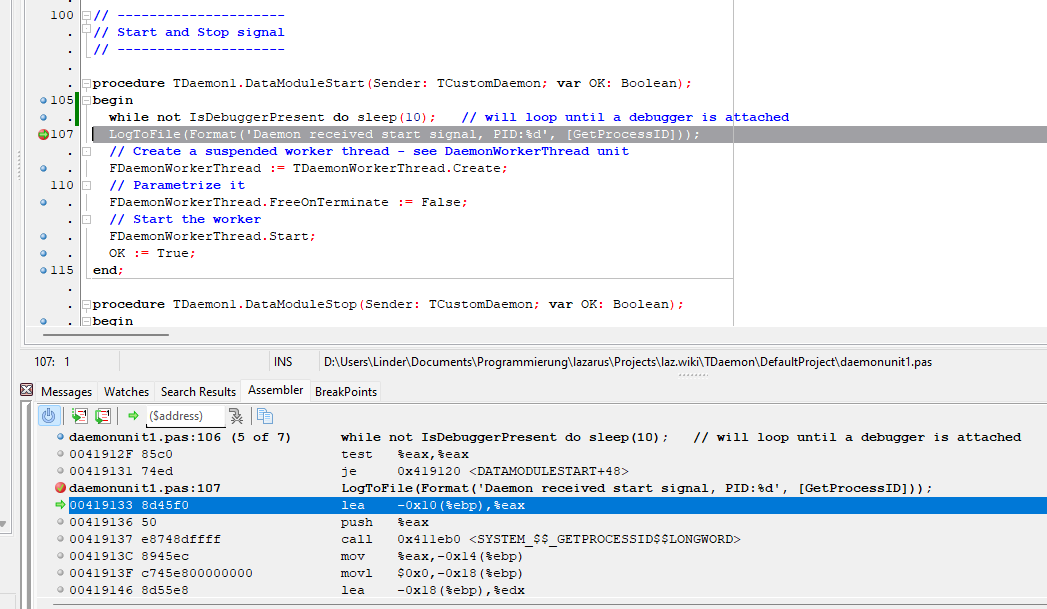
- “若需调试创建或启动服务的处理代码,或是在“附加到程序”之前就可能要执行的代码,可插入以下代码让代码等待,直至调试进程附加完成:
// 以下代码将维持循环至调试进程附件完成
While not IsDebuggerPresent do sleep(100);   // 循环至调试进程附件完成
// ... 在循环后可加入断点,以便在循环结束后立即捕获异常
调试进程完成并按下[F9]后,守护进程将停止于断点位置。
Linux
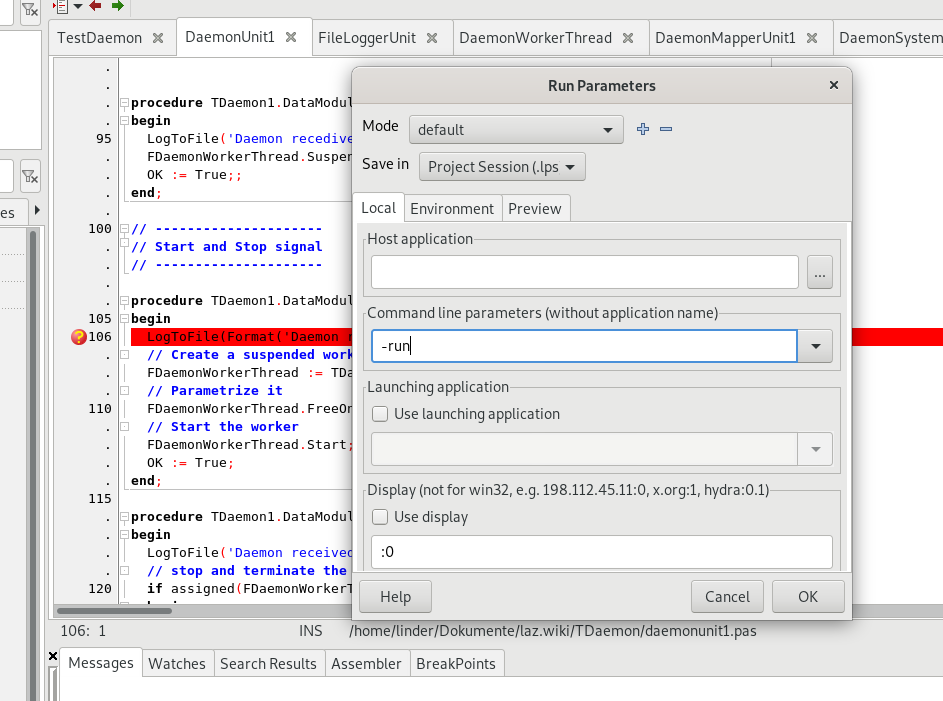
从某种程度上说,在 Linux 中守护进程可能更容易调试,因为可在 Lazarus IDE 中像其他程序一样运行,只需在“运行-运行参数”菜单的“命令行参数”中输入 -run 即可。不过请记得,很多问题都源自操作系统的安全限制。当守护进程在用户模式下运行时,这些限制很多都不适用。
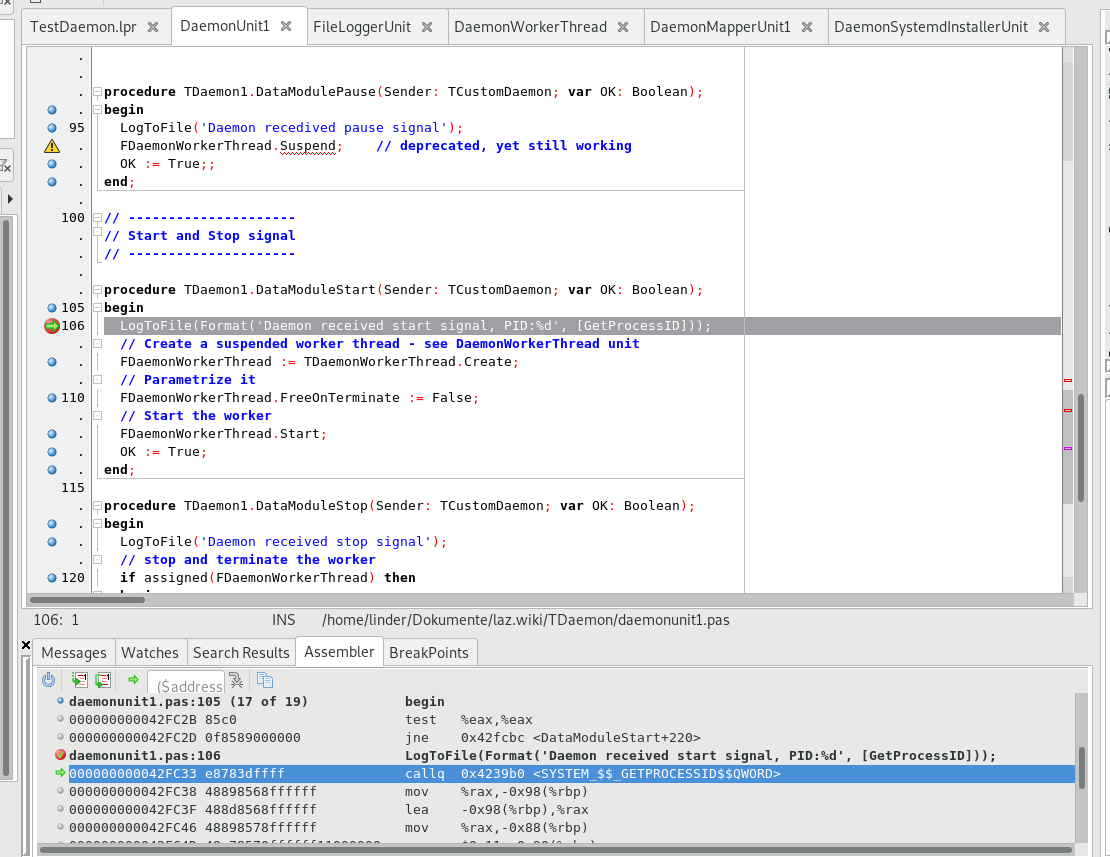
现在可以像普通应用一样,用[F9]启动守护进程并进行调试了。
如果确实需要将调试器附加到正在运行的守护进程上,比如怀疑问题与某项安全限制相关,那么可通过“运行-附加到程序”来实现,前提是已将守护进程配置为指定用户运行,而不是 root 用户。请参阅上述关于 Linux 安装和卸载功能的内容,了解如何向 .service 文件添加适当的参数。
很遗憾,Linux 不支持像 Windows 那么方便的“IsDebuggerPresent”,但以下技巧的效果也不错。
procedure WaitForDebugger;

var
  SetMeValue:boolean=false;

begin
  // Linux 技巧:附加调试进程,SetMeValue 改为 true。
  while not SetMeValue do
     sleep(100); // 在此设置断点
end;
请在“sleep”命令的那行设置一个断点。一旦守护进程由 systemctl 启动后,将在 while 循环中的断点处停止运行。此时可将调试进程附加于从 systemctl 状态信息获取的 PID,对“SetMeValue”变量设置监视([Ctrl-F5]),然后用“评估/修改”上下文菜单将“SetMeValue”变量值由“false”改为“true”,并继续运行([F9])。于是程序会立即退出 while 循环,并运行至下一个断点。
已知问题
与权限相关的问题
虽然大部分核心守护进程代码可在某个用户帐户下和 IDE(Lazarus)中完成开发,但实时守护进程很可能要在不同的上下文中“后台”运行。出于安全考虑,现代操作系统运行守护进程的环境或多或少都存在一些限制。守护进程没有终端和 GUI 来显示消息,因此此类问题可能会很难调试。遗憾的是,在 FPC/Lazarus 支持的所有操作系统中,没有通用的方法可以解决全部与服务相关的问题,因为 Windows、Linux 和 macOS 对服务的限制策略差别很大,甚至相同操作系统的不同版本也在不断变化,新版本的限制往往更多。
当从开发者帐户迁至“上线”状态,并测试服务用户帐户或“Localsystem”、“root”账户下运行的守护进程时(顺便提一下,用超级帐户运行历来视为不安全做法),请花时间研究一下操作系统的安全文档,了解代码在后台运行时所受的安全限制和其他特性。
EStreamError 异常:"no streaming method available"
Exception at 0041A30E: EStreamError:
Failed to initialize component class "TDaemon1": No streaming method available.
说明在纯用代码创建的守护进程项目中,包含了可视化组件(这些组件需由 GUI 应用的 .lfm 文件创建的内部资源流进行初始化)。如果决定用纯代码创建守护进程,那么可能既不应包含 LazDaemon 包,也不应在 uses 部分加入“LazDaemonApp”。否则,项目虽然可以通过编译,但在启动 exe 文件时,会遇到上述错误。
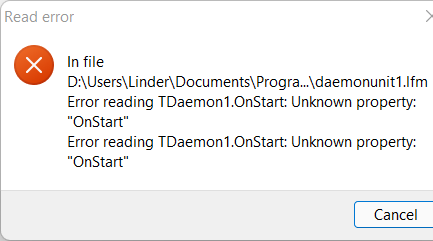
“Stream Read”和“Unkown Properties”错误 ...
用 Lazarus IDE 加载守护进程项目时……。
要打开的很可能是一个基于 TDaemon(GUI 组件)的项目,但 LazDaemon 包还未安装。
请中止所有加载错误,并按照前文的说明用 Lazarus 软件包管理器安装 LazDaemon 包。重新编译 Lazarus 后,此项目应能加载并顺利编译了。
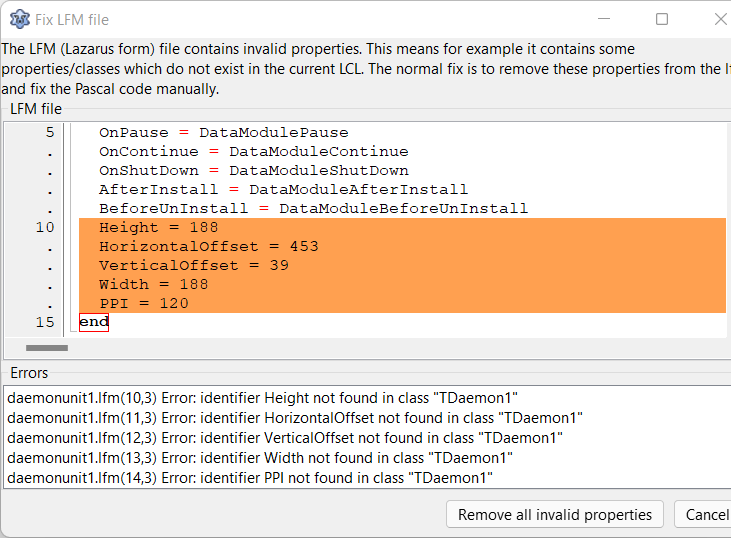
Lazarus IDE 建议清理 .lpm 中的非法属性
要打开基于 TDaemon(GUI 组件)的项目时,会出现的另一个问题,LazDaemon 包尚未安装。
请中止所有加载错误,并按照前文说明用 Lazarus 软件包管理器安装 LazDaemon 包。重新编译 Lazarus 后,该项目应能加载并顺利编译。
因不支持线程而在 Unix 中无法启动守护进程
代码编译没有问题,但用控制台和 -run 参数运行守护进程时,会显示类似“no thread support compiled in”的信息。如果用 systemctl 启动守护进程则不显示任何信息,貌似根本就没有运行。可用“systemctl status”查看守护进程的最后一条报错信息,会与用 -run 参数启动时的崩溃信息相同。
This binary has no thread support compiled in.
Recompile the application with a thread-driver in the program uses clause before other units using thread.
Runtime error 232 at ...

...

No heap dump by heaptrc unit
Exitcode = 232
很有可能在编译项目时没有启用对 CThreads 库的支持(在 Windows 中不需要此库)。请参阅前文的项目 lpr 文件示例代码和“UseCThreads”的说明文档。简而言之,需打开 .lpr 文件,并移除包裹“uses CThreads”语句的 {$IFDEF UseCThreads} ... {$ENDIF} 条件编译指令,这样在 Linux 中就会将 CThreads 库链接到代码中。在 Windows 中用不到 CThreads 库。
Windows 系统中出现的调试问题
在 Lazarus 的快捷菜单栏中,断点命中后会激活“暂停”按钮。但远程调试正在运行的进程时,按下按钮似乎并不起作用,反而会挂起调试器。因此断点命中后,请换用“运行”[F9]键继续调试。
若要将调试器附加到正在运行的守护进程上,需以管理员权限(提权)运行 Lazarus IDE,否则会收到“Error 5 (access denied)”的提示。
如果“运行”菜单中的所有调试项均不可用(灰色),请进入“项目-项目选项-调试器”,将“调试器后端”设为“Gdb [GNU调试器(gdb)]”。据观察,如果将项目源码文件从一台计算机/Lazarus 环境复制到另一台时,可能会出现此类问题。
Linux 系统中出现的调试问题
用“附加到程序”功能通过进程ID(PID)调试正在运行的守护进程,似乎并不起作用,报错“Debugger Error”……“Attach failed”。其中一个原因可能是未在服务控制文件中指定用户账号,因此服务以“root”身份运行,使得调试无法进行。除了使用专用于服务的用户运行服务之外,还有一种解决办法是在 Lazarus 中加载守护进程,即在“运行-运行参数”输入 -run 命令行参数。这样确实可以进行调试,但请注意代码这时运行于不同的上下文中(是当前用户而不是系统或服务专用用户),运行效果可能因权限问题而发生变化。
守护进程无权限访问网络/云存储(Onedrive 和 Dropbox)
This may be confusing, since -install and -uninstall will likely work and log fine, because they are usually executed by hand and thus run in your user's context. 若要选择守护进程可执行文件存放数据的目录(默认也用于记录日志),请记住后台运行的守护进程通常会运行于系统或服务账户的上下文中。如果虚拟驱动器是由某个普通用户创建的,则通常其他用户和系统用户均无法使用。从网络/云驱动器很可能无法启动守护进程,因为操作系统找不到可执行文件,并且日志也会写入失败,因为日志文件默认将写入可执行文件所在位置。而 -install 和 -uninstall 命令通常是手动执行的,即运行于当前用户的上下文中,因此或许可以正常执行并记入日志,于是或许会很令人困惑。
Linux 中指定运行服务的用户无法生效
守护进程启动后,如果查看其运行于哪个用户下,虽然在 systemd 的 .service 文件中指定了用户账号,但似乎仍以 root 身份在运行。
有(未经证实的)报告称,(在某些版本的 Linux 中?)控制 systemd 的 .service 文件中,“User”条目必须位于“ExecStart”条目之前才能生效,Linux 安装和卸载功能部分的例程已有展示。
系统代码页 / UTF-8
[陈旧内容,需要验证 3/2022, 或许已废弃]
LazDeamon 项目正在使用默认的、非 UTF-8 的代码页。项目选项 ... -> 编译器选项 -> 附加和覆盖 -> 使用系统编码中的 -dDisableUTF8RTL选项必须启用。
[一些旧的内容:有待验证、合并或删除]
[Old content, needs verfification 3/2022, may be obsolete]
Linux(仅限旧版 Debian)
下载、配置、另存为 - 网上的归档文件 [1] (原始链接已失效久矣)。
- SVC_ALIAS 是应用的详细说明。
- SVC_FILENAME 是编译好的服务应用的实际文件名。
- SVC_DIR 是服务应用的存放位置。
- SVC_SERVICE_SCRIPT 是将自定义 debian-service.sh 另存后的最终名称。
将自定义脚本放入 /etc/init.d/ 目录。
用“sudo service Name_Of_Your_Script start”命令启动服务。
![]() Note: sudo 有很多版本的用法,比如:
Note: sudo 有很多版本的用法,比如:
sudo -s #

sudo -H #

sudo -i  #

sudo su  #
sudo sh #
服务若需在系统启动时能自动运行,可用 update-rc.d 命令或第三方工具来实现。
第一种方式:
sudo update-rc.d Name_Of_Your_Script defaults
第二种方式:
sudo apt-get install chkconfig
sudo chkconfig --add Name_Of_Your_Script
sudo chkconfig --level 2345 Name_Of_Your_Script on
参阅
- GitHub Repository 示例项目完整源码(.zip)
- macOS daemons and agents - macOS 原生代理,用到了 launchd
- ServiceManager Windows 服务管理的 Free Pascal 示例单元
- Michaël Van Canneyt 撰写的文章:Taming the daemon
- Docker Containerization - 容器化,一种创建守护进程/服务的手段
- UniqueInstance
