Custom Drawn Interface/Using the Android SDK, Emulator and Phones
This article applies to Android only.
See also: Multiplatform Programming Guide
│
English (en) │
русский (ru) │
Go back to Custom Drawn Interface/Android
Using the Android SDK
Downloading and installing the Android SDK is easy. One just needs to following this link: http://developer.android.com/sdk/index.html
How to configure Ant
When issuing 'ant debug' to build and Android project one might receive a lot of errors about missing dependencies. In Linux those can be solved by installing packages which have these dependencies, and that will change from distribution to distribution.
Configuring Ant in Mandriva Linux
These errors:
/usr/bin/build-classpath: error: Could not find jaxp_parser_impl Java extension for this JVM
/usr/bin/build-classpath: error: Could not find xml-commons-apis Java extension for this JVM
Can be fixed, respectively, with:
urpmi xerces-j2
urpmi xml-commons-jaxp
Generic Ant errors
This error:
/home/felipe/Programas/lazarus-ccr/examples/androidlcl/android/build.xml:46: taskdef class com.android.ant.SetupTask cannot be found
Means that you need to update the Paths in your project files to correctly point to the SDK.
Recognition of devices under Linux
Unlike in Windows, where one needs to install a new set of drivers for nearly every phone, in Linux the Android devices are recognized as generic Android devices (regardless of being a phone, a tablet or a notebook) and they are ready to be used without installing additional drivers. One issue, however, that often appears is that devices are not fully recognized automatically and one receives the error message "?????? no permissions". In this case the command adb devices will look like this:
[felipe@localhost ~]$ cd Programas/android-sdk-linux_x86/tools/
[felipe@localhost tools]$ ./adb devices
List of devices attached
????????????    no permissions
To solve this issue one can proceed with the following steps:
Step 1 - First read the tag of the device using lsusb run as root (or sudo):
[root@localhost Programas]# lsusb
Bus 001 Device 001: ID 1d6b:0002 Linux Foundation 2.0 root hub
Bus 001 Device 003: ID 04e8:681c Samsung Electronics Co., Ltd
Bus 002 Device 001: ID 1d6b:0001 Linux Foundation 1.1 root hub
Bus 003 Device 001: ID 1d6b:0002 Linux Foundation 2.0 root hub
Bus 004 Device 001: ID 1d6b:0001 Linux Foundation 1.1 root hub
Bus 005 Device 001: ID 1d6b:0001 Linux Foundation 1.1 root hub
Bus 006 Device 001: ID 1d6b:0001 Linux Foundation 1.1 root hub
Bus 007 Device 001: ID 1d6b:0001 Linux Foundation 1.1 root hub
Bus 008 Device 001: ID 1d6b:0001 Linux Foundation 1.1 root hub
The tag in this case is 04e8
Step 2 - Now, still as root, edit the file /etc/udev/rules.d/51-android.rules
If the file doesn't exist yet, then create it. Add the following line to the file:
SUBSYSTEM=="usb|usb_device", SYSFS{idVendor}=="04e8", SYMLINK+="android_adb", MODE="0666"
Change the ID to correspond to the id of your device.
Step 3 - Restart the linux usb service (udev)
In Ubuntu this can be done with: sudo services udev restart
In Mandriva udev doesn't appear as a service, so the only way to get things working for me was restarting the computer.
After doing this, the device should be fully recognized and "adb devices" as well as "adb logcat" should work.
[felipe@localhost tools]$ ./adb devices
* daemon not running. starting it now on port 5037 *
* daemon started successfully *
List of devices attached
1000c31696b6    device
Using the Emulator
Installing the Emulator
Building an emulator image with sdcard support
Step 1: Run the application C:\Program Files\android-sdk-windows\tools\android.bat
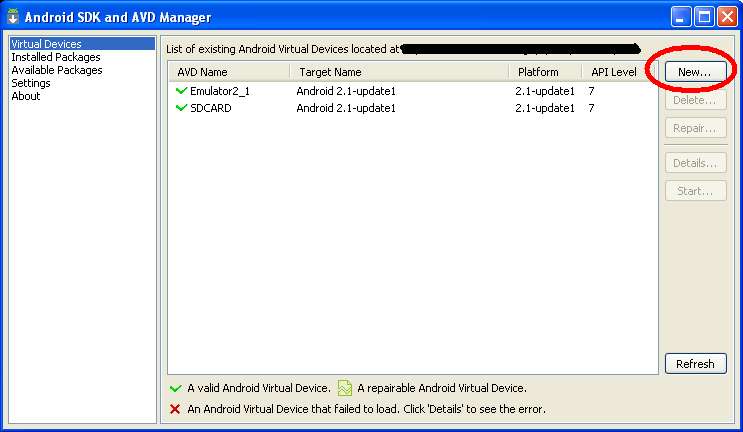
Step 2: Create a new image, by clicking the New button as in the image below.
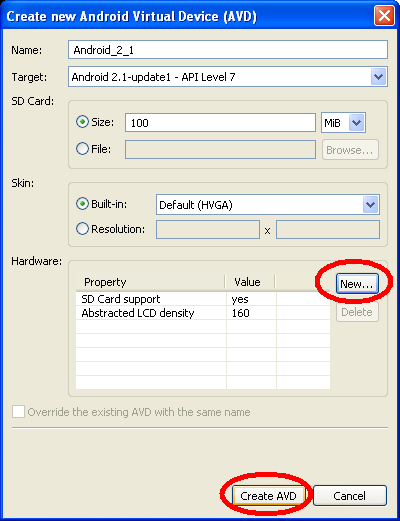
Step 3: Set the name and properties of the image, the size of the SDCard and add hardware support for the sdcard, as seen on the image below.
Running an emulator image
Step 1: Run the application C:\Program Files\android-sdk-windows\tools\android.bat
Step 2: Select the image
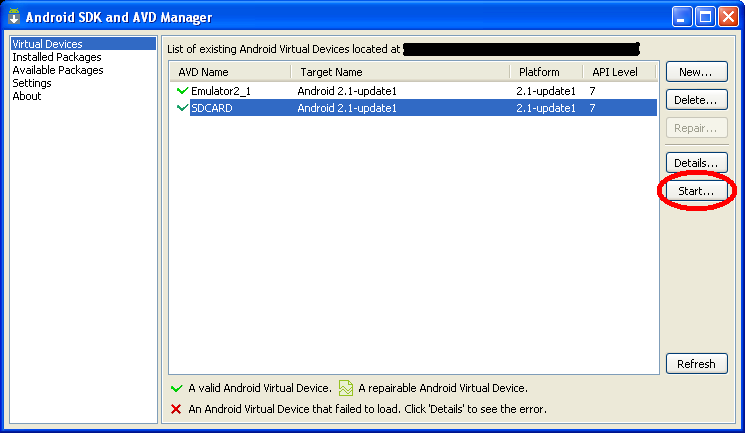
Step 3: Click on the "start" button, as seen below.
Copying files to the emulator
You can use a script similar to this one to copy files from your hard-drive to the emulator. Notice that the image must be running and that it must have sdcard support built inside itself.
c:
cd "Program Files"
cd android-sdk-windows
cd tools
adb push C:\Mypath\Somefile.extension /sdcard
pause
Installing applications in the emulator
Android apps should be packaged in the Android .apk file format. For more information about how to create an .apk file that you can install on an emulator/device instance, see Android Asset Packaging Tool (aapt). After packing a file, it can be installed in the emulator by using the following adb call:
c:
cd "Program Files"
cd android-sdk-windows
cd tools
adb install C:\Mypath\MyApp.apk
pause
Using the phones
Installing the drivers and getting a reliable way to transfer executables and debug software with all the different Android phone can be a challenge in itself.
Installing a File Manager
Astonishingly, Android phones don't come with a file manager o.O One can however simply download one from the Android Market. I suggest the following instructions:
1. Connect the phone to a WiFi or Mobile network
2. Click in the "Market" icon in one of the Android desktops. It will be necessary to log into a Google Account to access it.
3. Click the search button and type "oi"
4. Locate and install the "OI File Manager" which is Free
Samsung Galaxy S
The first thing to do when using Samsung Galaxy S is not believing the Samsung instructions. They will say that one should install Kies, their horribly crappy PC suite which is 130MB large and fails to install because the first thing that it does is failing to connect to a server in Korea to download even more files. Instead of doing this, following these instructions:
1. Go in the phone menu Settings -> About Phone -> USB settings. Change from "KIES" to "Mass storage"
2. Download and install 19 MB of Samsung USB drivers from: http://drivers.softpedia.com/dyn-postdownload.php?p=96692&t=4&i=1
3. Connect the cable of the phone
4. Drag the top menu of the phone down and mount the sdcard


